Manage User Accounts and Profiles
- Available with
- Free
- Tailored
- Team
Managing User Accounts
iTop provides a user management module allowing administrators to assign users with one (or more) predefined profiles. The combination of profiles determines for each user the actions she/he is allowed to performed in iTop (viewing, creating/modifying or deleting which objects).
In the current version of iTop, the profiles are predefined; there is no user interface to modify them or to create new profiles.
Viewing Profiles
Use the “Admin Tools / Profiles” menu to access the profiles and see their corresponding definitions as shown below:
When you click on a given profile, the details of this profile are displayed.
-
The tab “Users”, lists all users having this profile.
-
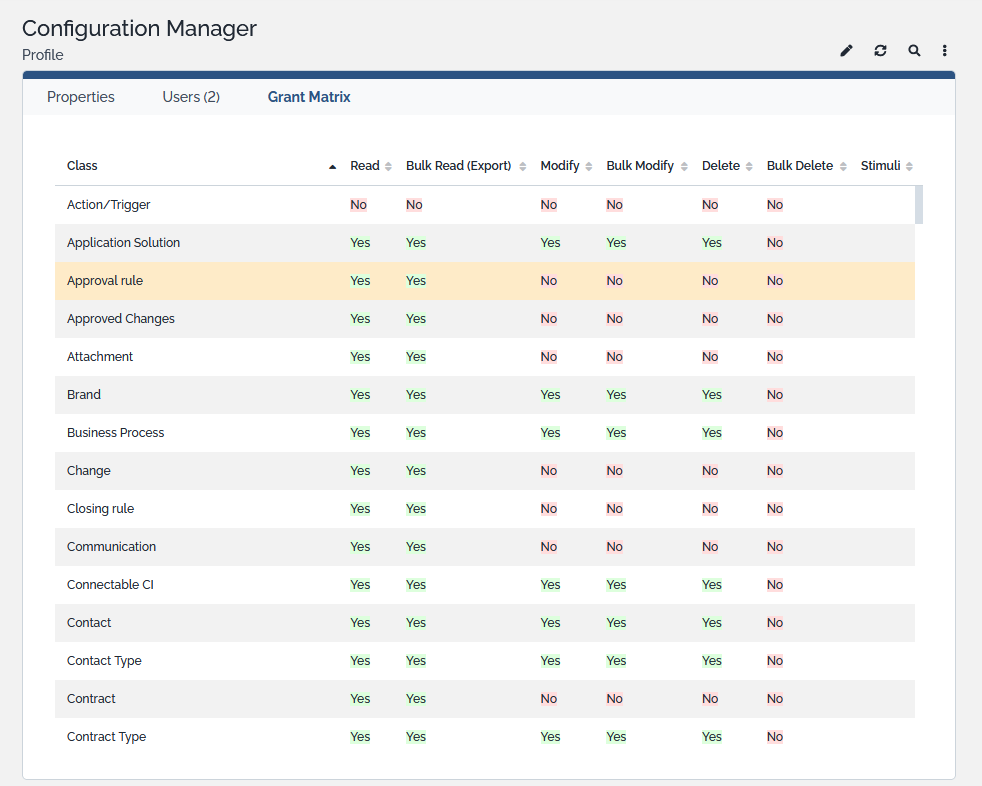
The tab “Grant matrix” displays, for each class of objects, all the actions allowed for this profile.
Default profiles
| Profile | Description |
|---|---|
| Superuser | Has all the rights on iTop, the only profile allowed to become Owner... |
| Ticket Manager | Helpdesk Team profile allows to manage the tickets. Can access CMDB but is not able to modify it. |
| Configuration Manager | Person in charge of the documentation of the managed CIs. |
| Portal user | Has the rights to access to the user portal. People having this profile will not be allowed to access the standard application; they will be automatically redirected to the user portal. |
| Portal power user | Users having this profile will have the rights to see all the tickets for a customer in the portal. Must be used in conjunction with other profiles (e.g. Portal User). |
Viewing User Accounts
The menu “User Accounts” under “Admin Tools” module, enables you to see all logins defined for your iTop instance.

When clicking on a user you get the following details:

A user account must be linked to a Person stored in the CMDB (See the CMDB Module documentation). Prior to creating a login, make sure that the user is documented as a Person in the CMDB.
If no contact is defined for a login, then that login will suffer several limitations (list not exhaustive):
-
Cannot receive email notifications. Example: a ticket has been created for customer x.
-
Cannot be responsible for something. Example: the agent a ticket is assigned to.
-
No access to the customer portal.
The tab “Profiles” list all profiles that are linked to this user. The tab “Grants matrix” display rights allowed for this user. It is the merge of all rights corresponding to associated profiles. The tab “Allowed Organizations” display list of organization this user is allowed to see.
Creating a user
To create a new user you just have to click on “New” in action drop down list, from either user list or a given user detail. The following wizard then appears:
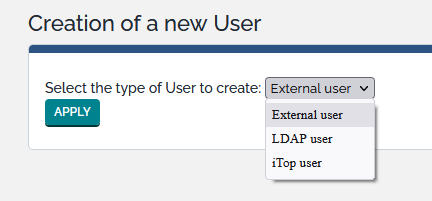
Administrators can define different types of user accounts, depending on the desired type of authentication:
-
iTop useraccounts are internal to iTop. Their passwords are stored (encrypted) within the database of iTop. This type of account is useful for administrative users, for scripts and integration with other applications. -
LDAP useraccounts have their authentication done by an external LDAP or Active Directory server. -
External useraccounts have their authentication managed directly by the web server, for example when using an Apache .htaccess file or when using an external single-sign-on solution, like for example JASIG-CAS.
All the details about authentication in iTop are described in the chapter User authentication options.
If you decide to create an iTop user, you have to type-in the password and to retype it a second time for confirmation. An exclamation sign appears at the right of the password field if both passwords do not match.
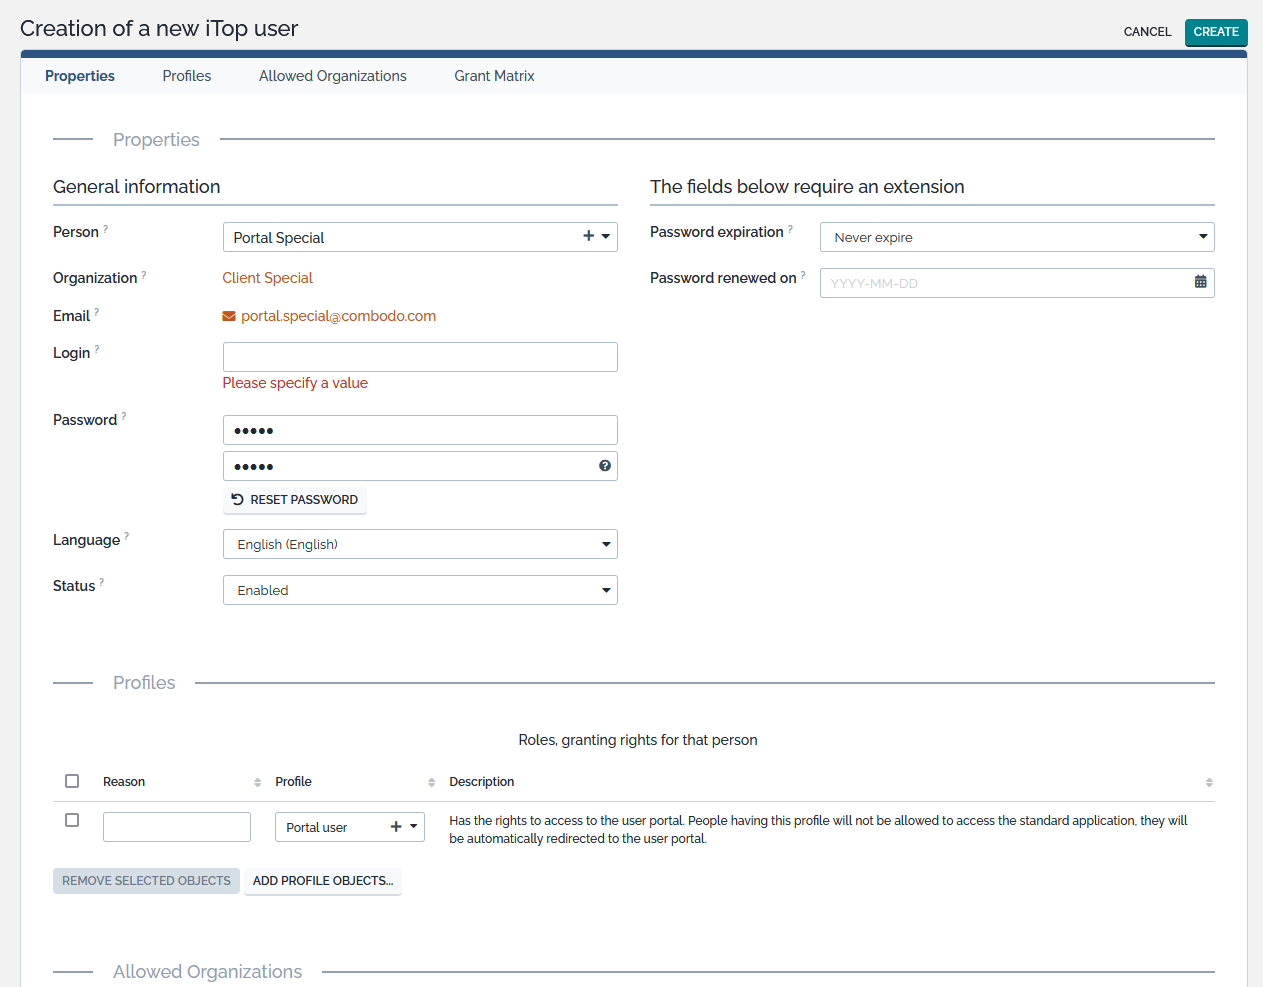
If you have password policies, the password will need to follow them
A user record defines:
-
The favorite language of this user, that will be used for displaying the iTop user interface.
-
The contact linked to this user account. This contact is also used - for portal users - to determine the default organization of the portal.
-
The list of profiles for this account. Each iTop user account must have at least one profile.
The “Add Profiles…” button displays the search window for selecting the profiles you want to assign to the user.
The profiles assigned to the user can be changed later on using the “Modify” action for a user.
Import logins massively
To create many logins in a few steps, you can use the CSV import tools.
Check the format to bulk import relationships.
You can check this example which is used for CLI import, but expected CSV import format is identical.
Restricting access to a set of Organizations
Administrators can define for each user the list of organizations she/he is allowed to access using the “Allowed Organizations” tab. If no organization is selected, the user is allowed to see all of them.
In case of a hierarchy of organizations (when some organizations have a parent organization), the rights are inherited from the parent to the child organizations. In other words, if a user has the rights to access the parent organization, then this user has also the rights to access all the child organizations of this organization.
An object is considered as belonging to an organization, if it has a field named exactly org_id which is an AttributeExternalKey or an AttributeExternalField on an AttributeExternalKey on class Organization.
Object without any org_id field are always visible to all users.
Object with an org_id field which would be empty (=0) are never visible to users with allowed organizations.
An Attachment object has an org_id field, fed with the organization of the object it is linked to. If that object has no org_id field, then it is empty, then it is not visible to users with allowed organizations.
All the objects belonging to an organization which is forbidden to a given user are completely hidden from this user. For this user, the application behaves as if such object did not exist.
If the contact corresponding to a user is in a forbidden organization for her/him, it looks (for this user) as if the contact does not exist. Since all users accessing the portal must be linked to a contact, such a configuration will prevent this user from accessing the iTop portal!
The selected organizations can be changed later on using the “Modify” action for a user.
Changing a user password
The administrator can change a user password if required by simply using the “Modify” action for a user. This can be useful to reset the password of a user.
Users can change their own password by clicking on the “Log-Off” menu and selecting “Change password…”.
The passwords are stored encrypted (one way) in the iTop database, and therefore cannot be reconstructed from the content of the database.
I forgot my password
Users having an iTop user type of account can reset their password on their own: there will be no need for the administrator to do anything.
More information in the chapter I forgot my password.
Deactivating an account
The User “Status” has two possible values: “Enabled” or “Disabled”. When set to “Disabled” the account is deactivated and the user can no longer connect to iTop. By default the value for the field is Enabled.
You still have unanswered questions ? Ask us.
Give, get, ask…
Join our community of users to share your knowledge and good practices.