Using webhooks
- Available with
- Tailored
- Team
Webhooks
Add webhook actions to integrate with 3rd-party apps when triggers are activated
Features
Allow outgoing webhooks via new actions on any existing triggers
-
send chat notifications to Google Chat, Rocket.chat & Slack, with the same placeholders as email notification.
-
replicate / mirror part of an object on another itop, through a simple configuration in json in an action and update local triggering object with remote information
-
call any third party application offering webservices
JSON payload must follow the official specifications (see here for more info), this means that payloads with single quotes instead of double quotes will fail.
Prerequisites
You need to be familiar with notifications in iTop, see here for more information.
Limitations
-
Webhook actions do not work with the TriggerOnLogUpdate trigger as it is restricted by “email-reply” to email actions only.
-
If asynchronous sending, total request cannot exceed 64MB when serialized, so URL + headers + payload should not excess 60MB (eg. if sending attachments).
-
If network error occurs, response callback is not called.
-
Google Chat action only works with Google Workspace (paid version)
Usage
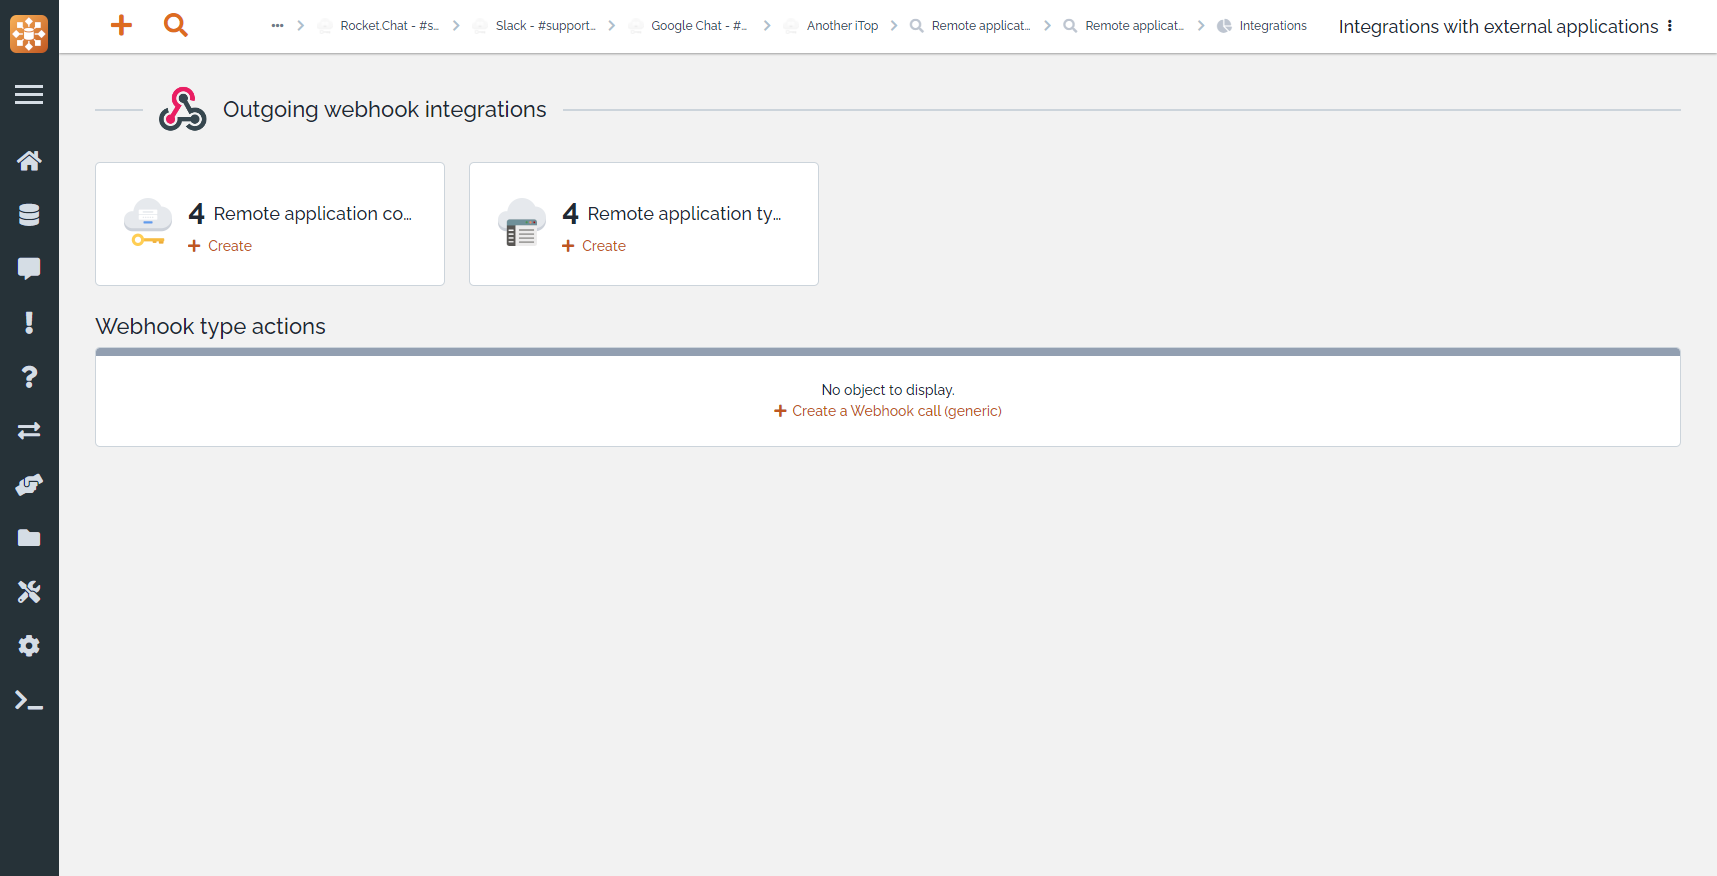
You have first to create a Remote application connections and Webhook actions to send data to third-party apps.
Remote application connections
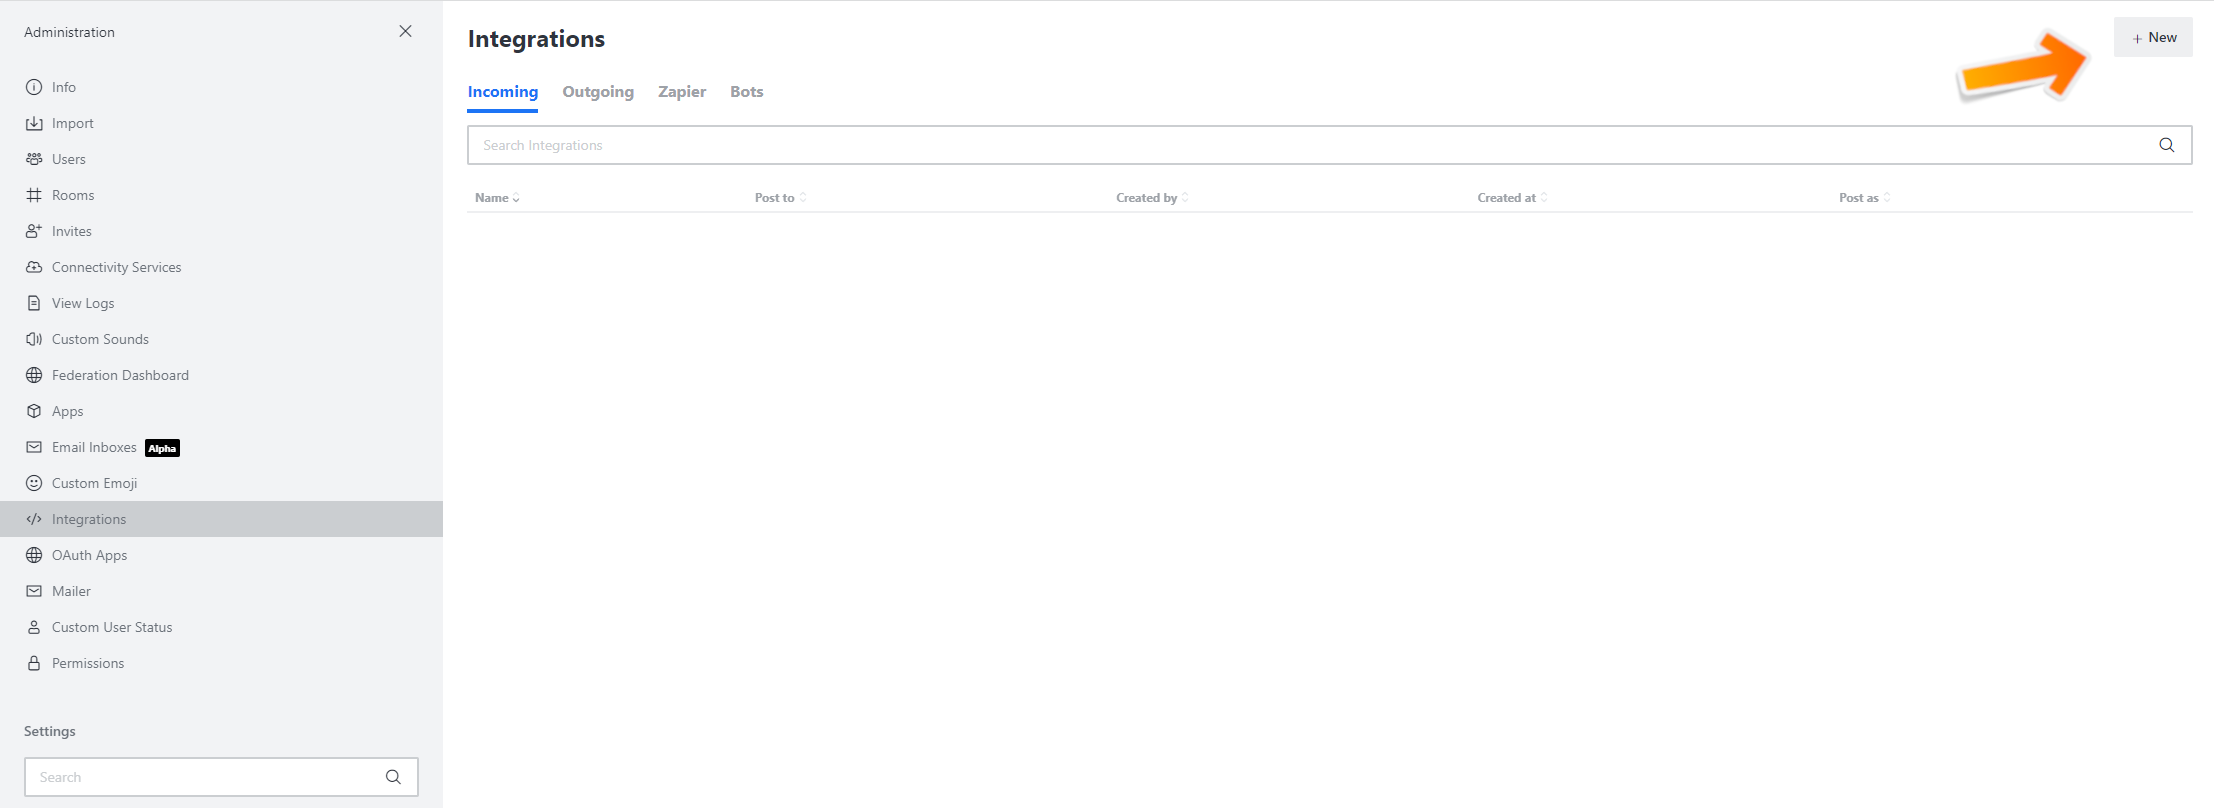
Available in the “Configuration > Integrations” menu, remote application connections are the repository of endpoints to the third-party applications you want to integrate with. They will be used by the Webhook actions.
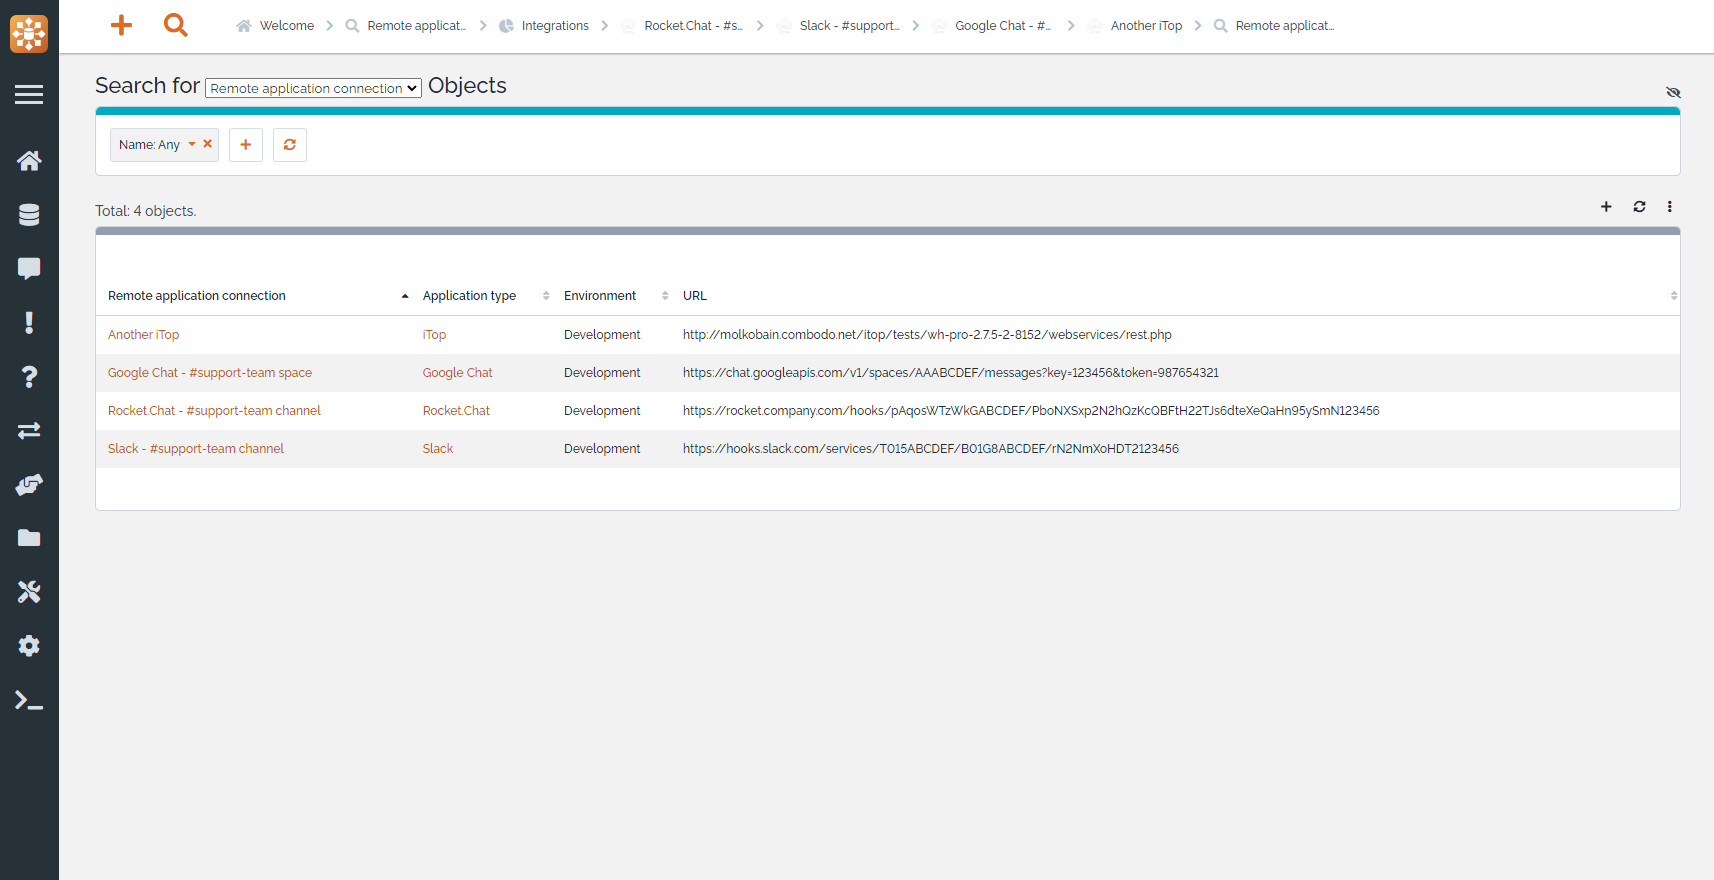
Here is an example for a Slack connection. The “application type” is a typology that has no impact it is just to ease filtering / documentation of all the connections.

Webhook actions
Webhook actions works like any other email actions:
-
Choose a destination (Remote application connection)
-
Link the desired Triggers
-
Configure the message / data to send
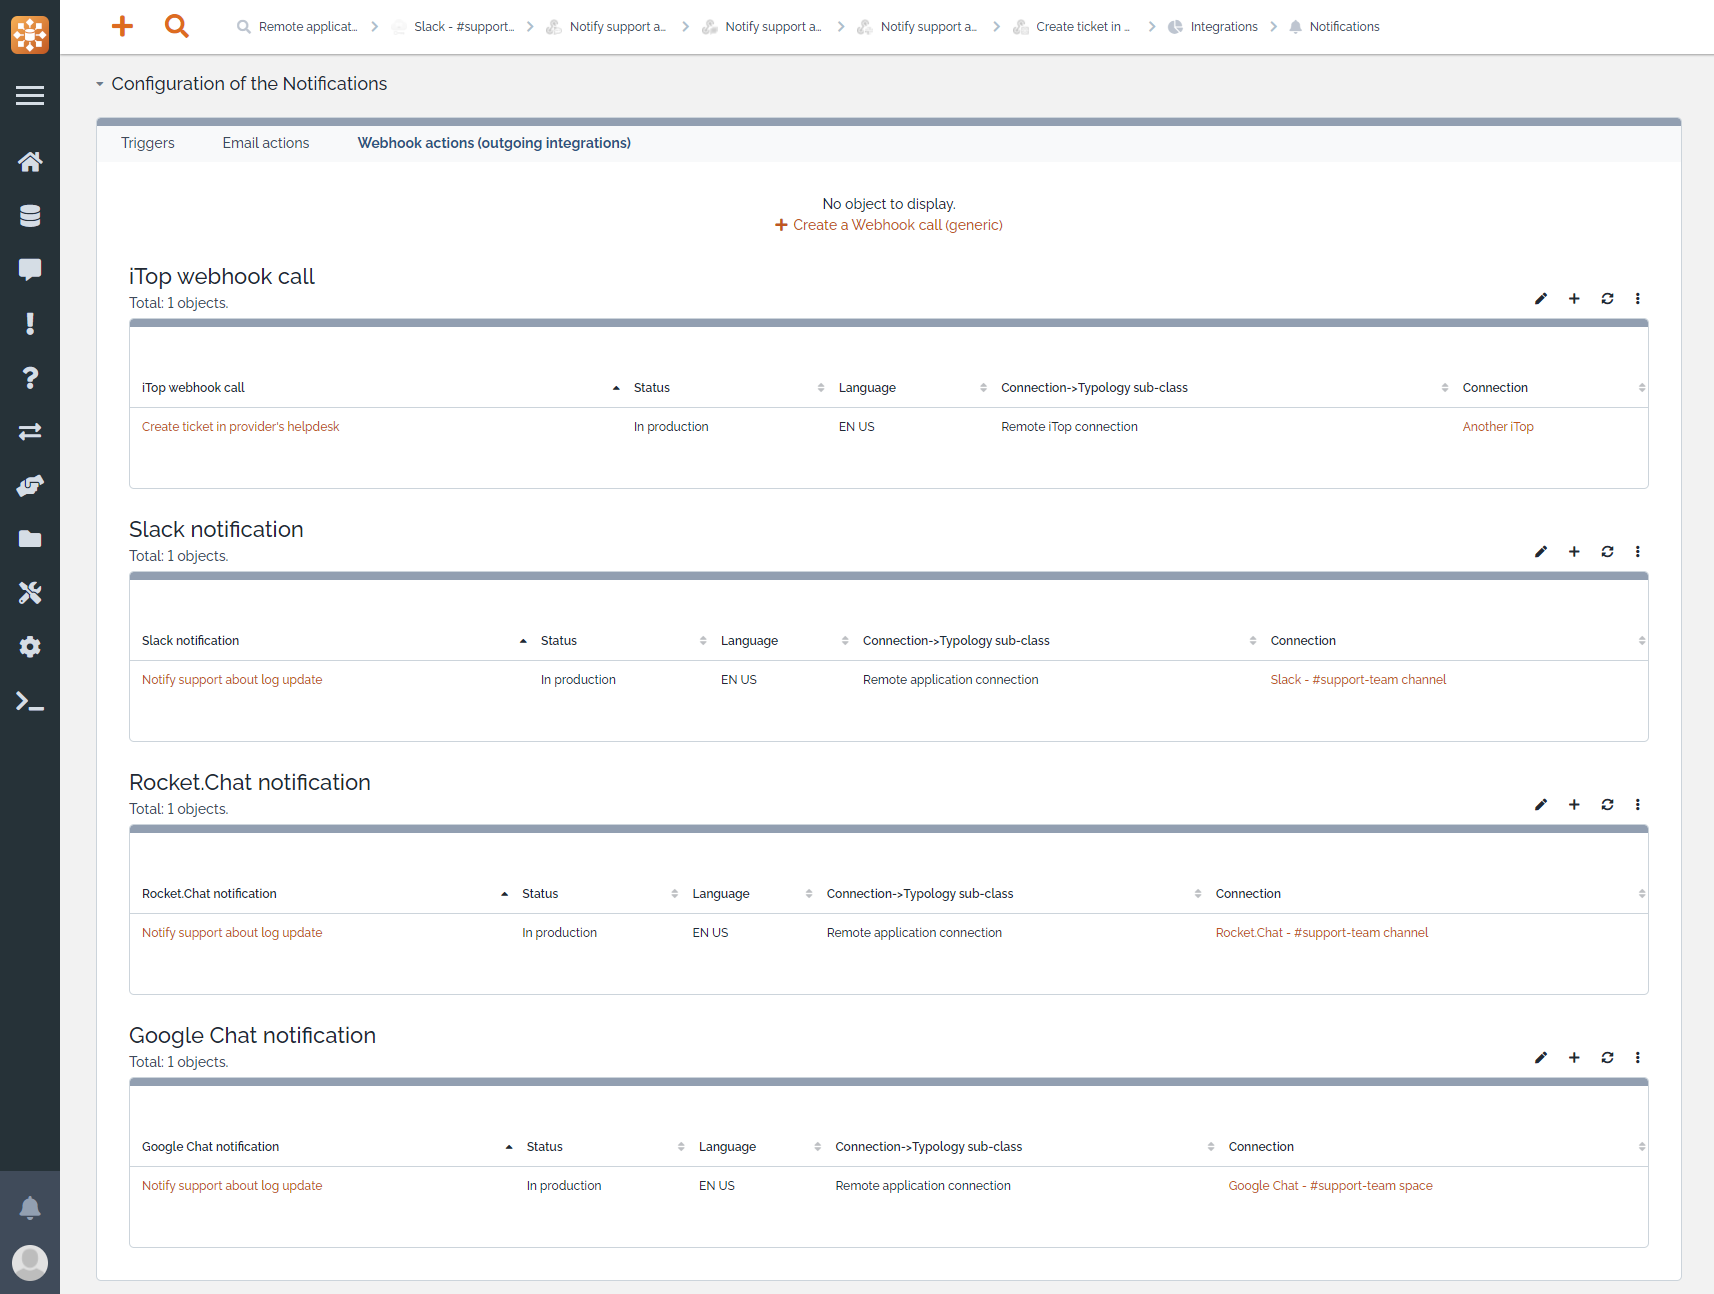
Out of the box, 5 new type of actions are available:
-
Slack notificationto send a message to a Slack channel / user -
Rocket.Chat notificationto send a message to a Rocket.Chat channel / user -
Google Chat notificationto send a message to a Google Chat channel / user -
iTop webhook callto call the standard REST/JSON API of another iTop -
Webhook call (generic)to call any third-party webservices
Note: All “app-oriented” actions are based on the generic one but they hide all the complexity of generating the request (headers, payload, …) so you can focus on the content you want to send.
Tutorials
The following tutorials are based on the apps automation processes at the time this documentation was written. Keep in mind that they may change some parts of the processes / GUIs making this tutorials outdated. In that case follow their documentations directly and contact us so we reflect changes here.
Slack notifications
Sending notifications to your Slack workspace requires 4 steps:
-
Create your own “Slack app” (necessary only once)
-
Add an “incoming webhook” to the Slack app (necessary only once per channel / user you want to send notifications to)
-
Add this webhook as a
Remote application connectionin iTop (necessary only once like above) -
Add the
Slack notificationaction in iTop
Slack full documentation is available here
1. Create your own "Slack app"
Note: This step is optional if you already configured a Slack app.
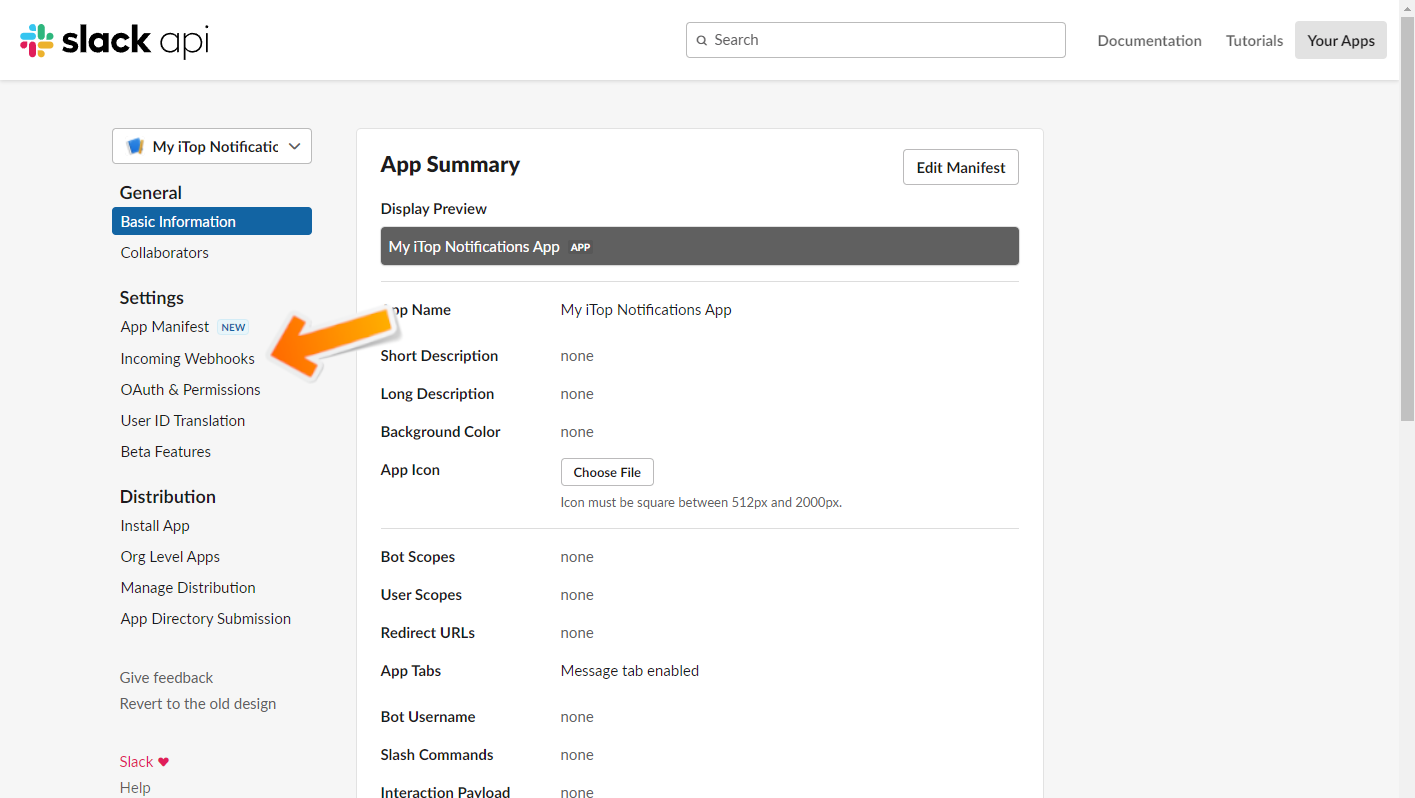
Go to the “Slack API” page and click on the “Create new app” button.
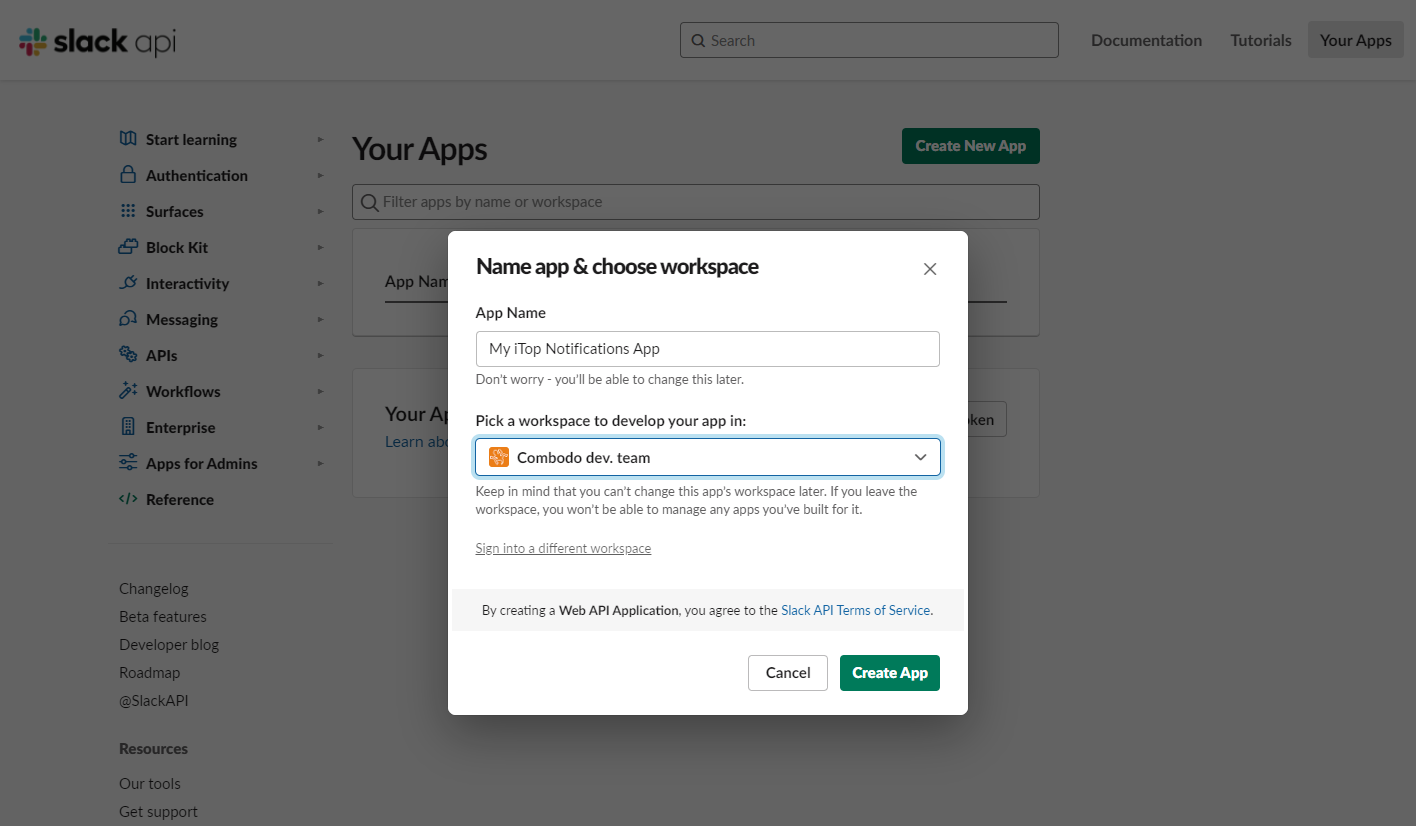
Configure it properties if you want, this step is optional but adding a custom icon and name brings a very nice touch to it.

2. Add an "incoming webhook" to the Slack app
Note: This step is optional if you already configured a webhook to the same desired channel / user.
On your app properties page, click on “incoming webhooks” in the left menu.
If not already done, activate the incoming webhooks.
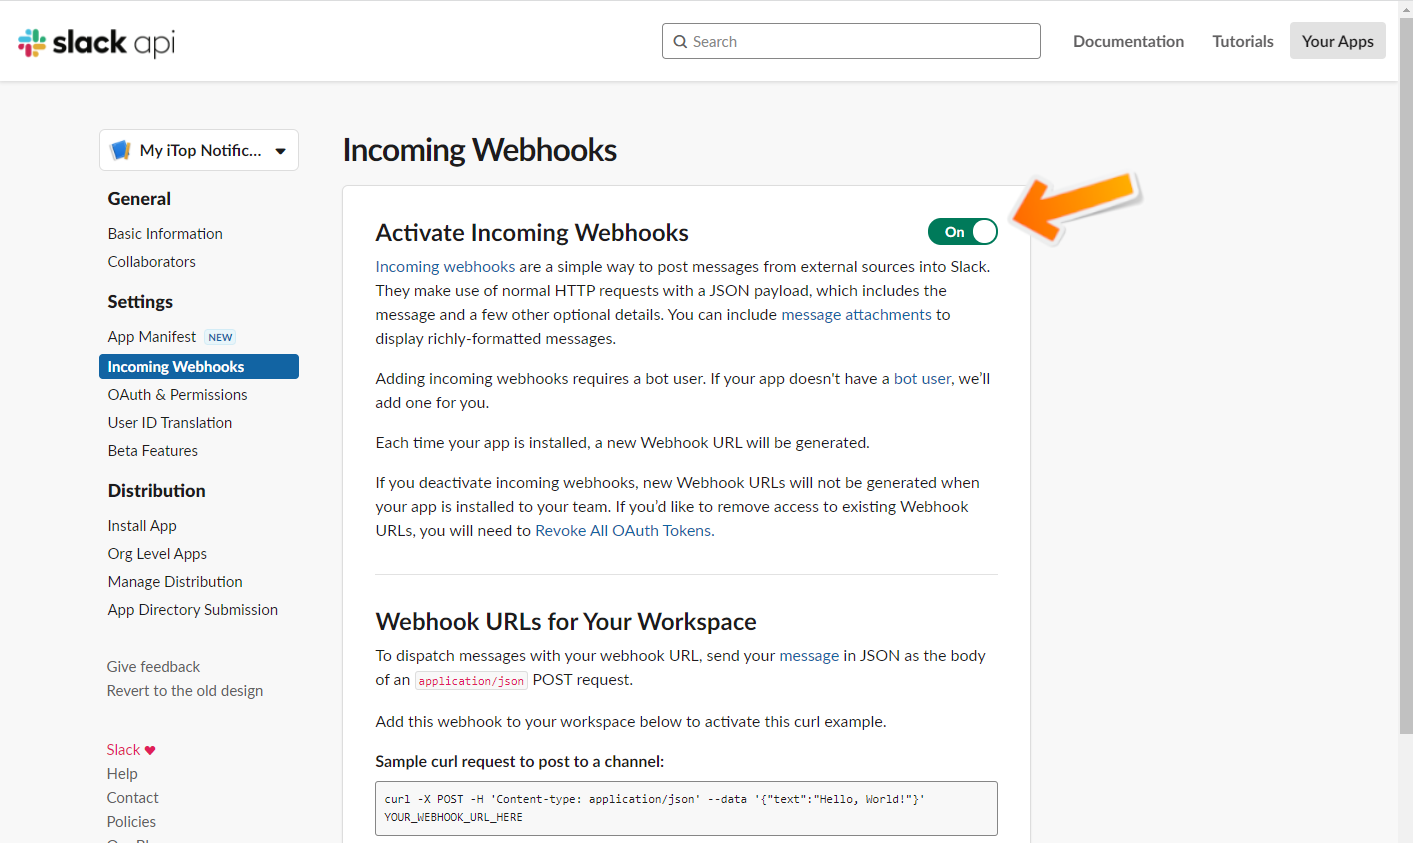
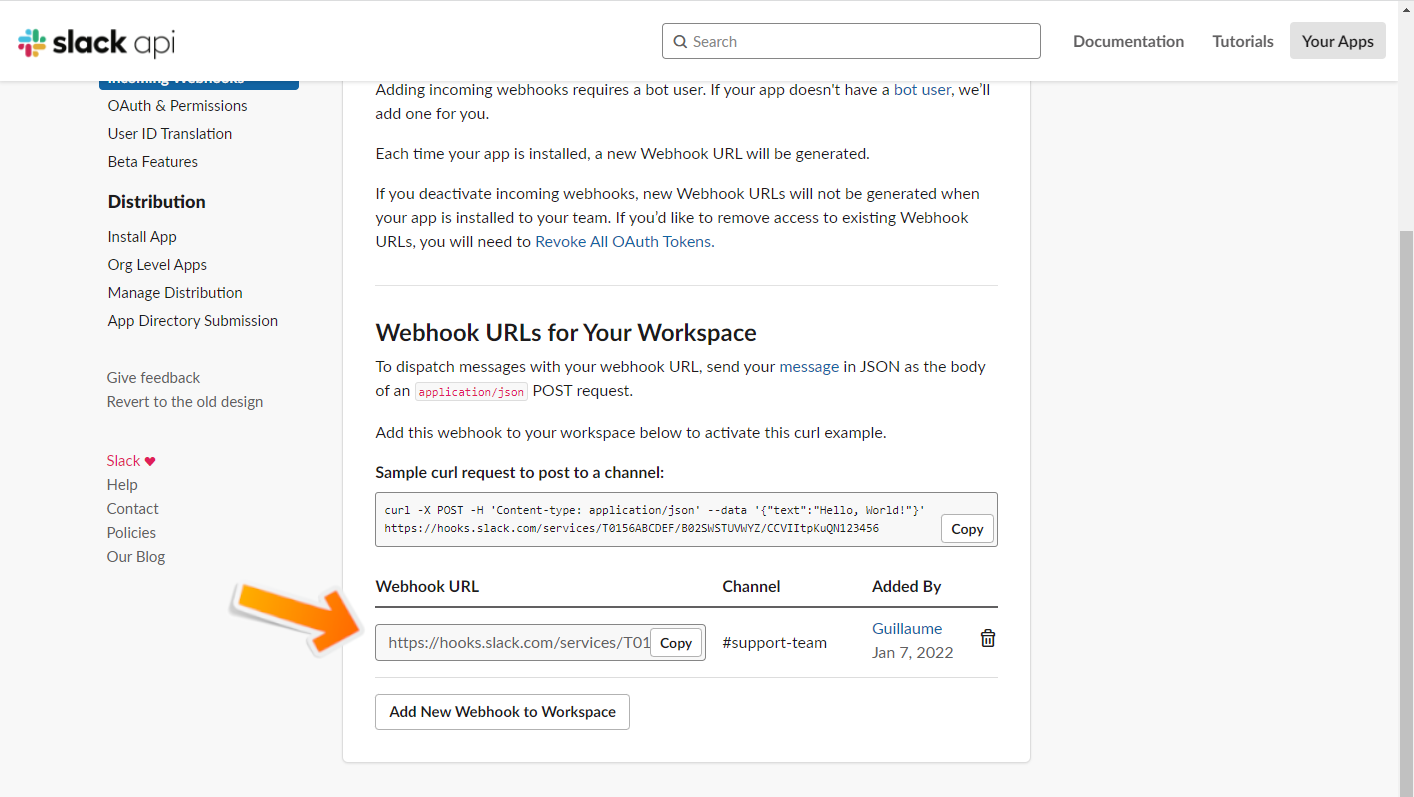
Then click on “Add a new webhook to Workspace” and select its destination (a channel or a user).

Once added, copy the webhook URL and go back to your iTop
3. Add a "Remote application connection" in iTop
Note: This is step is optional is you already configured a webhook to the same desired channel / user.
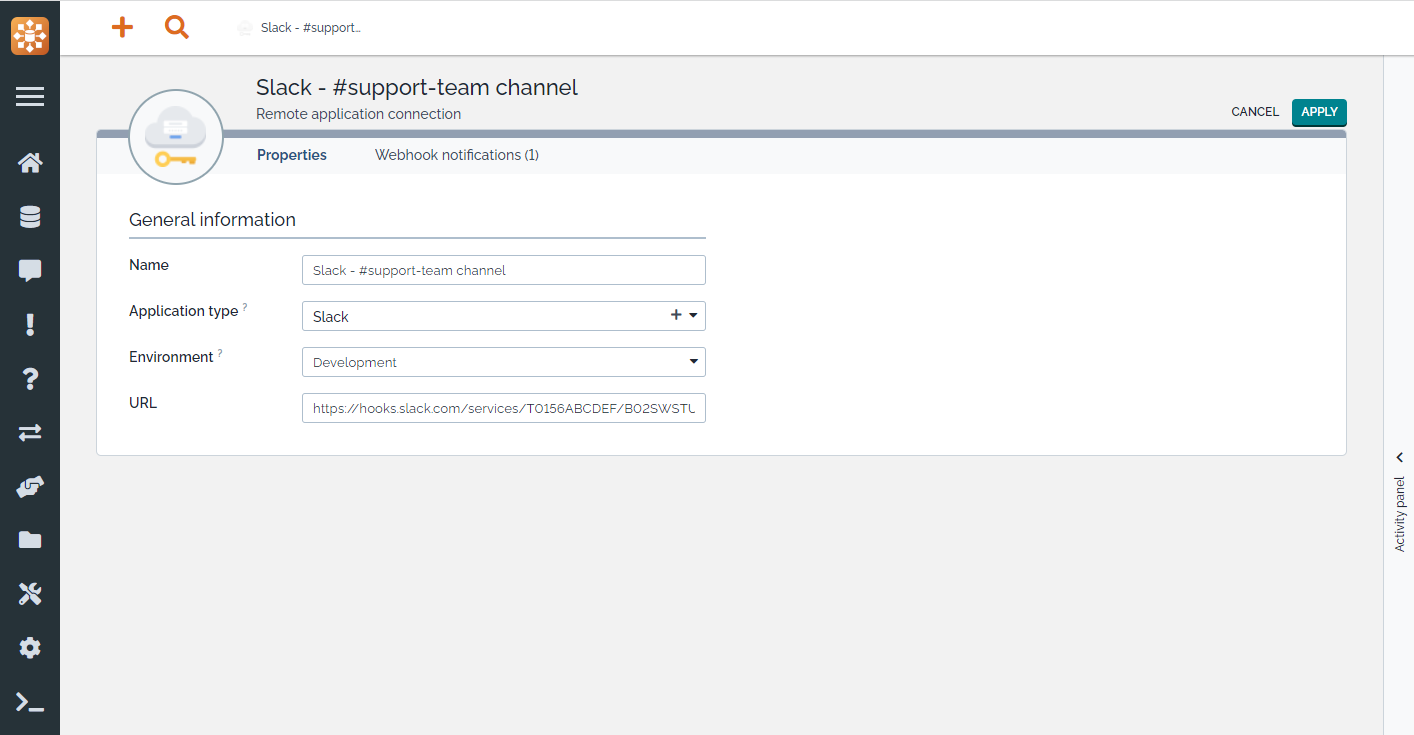
In your iTop, create a new Remote application connection and fill the attributes:
-
Application type: Just for documentation / information
-
Environment: Just for documentation / information
-
URL: The webhook URL retrieved from the previous step. It is possible to use $this placeholder. For instance if the webhook is triggered by a ticket $this→team_id→attribute$
4. Add a "Slack notification" action in iTop
In your iTop, create a new Slack notification action.
-
Select the connection created in the previous step
-
Prepare the message to send in Slack
-
Choose some extra options (hover on their labels to have details on their purpose)
-
Link at least one
Triggerlike for any other action
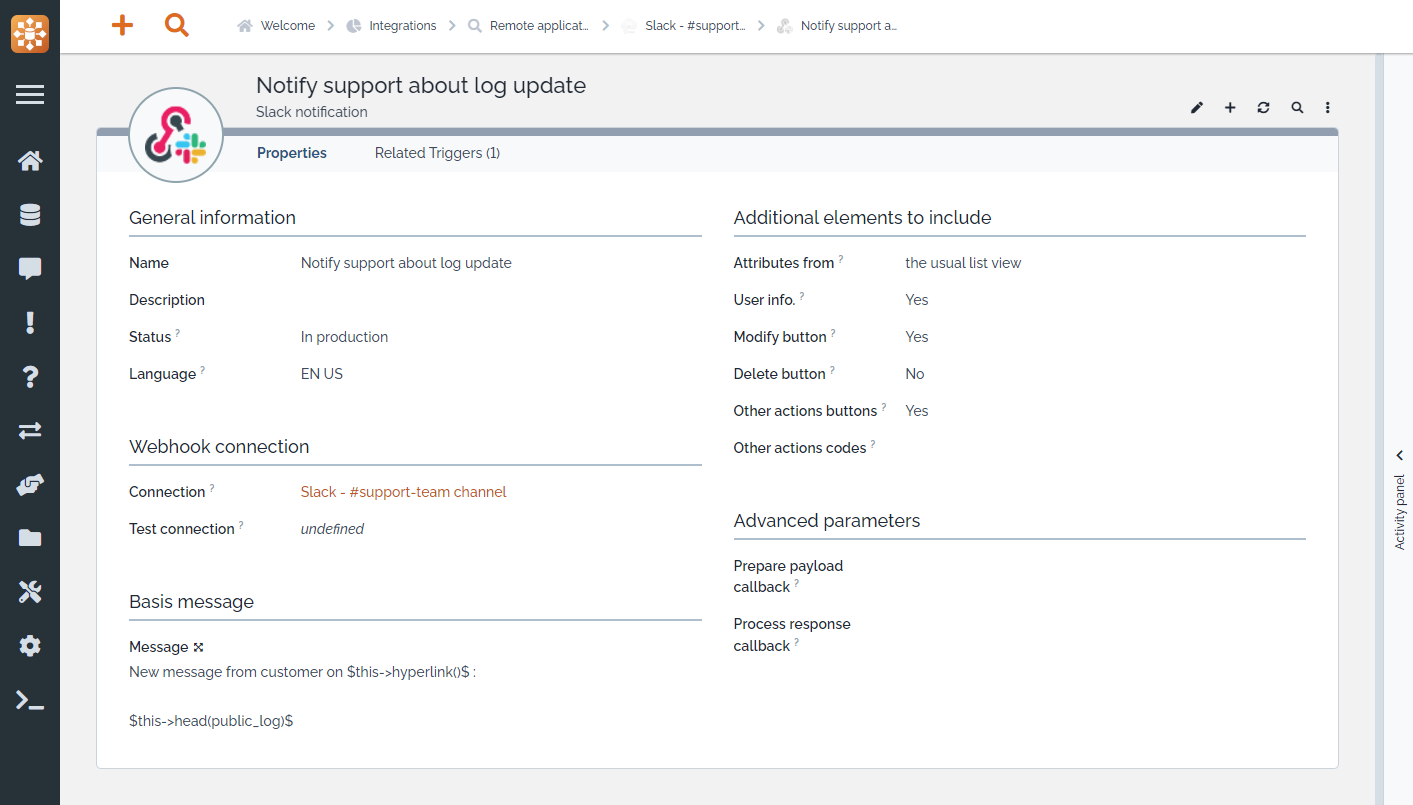
Description of the available attributes
| Slack notification | Purpose |
|---|---|
| Name | Free text to identify this particular notification |
| Description | Free text to describe this action |
| Status | To dis-activate this notification |
| Language | Just for documentation / information |
| Connection | This reference the URL, connection method,… to use for this notification |
| Test connection | This reference the URL, connection method,… to use for this notification when in Test status |
| Message | Text which will be written in Slack. You can use standard Notification placeholders |
| Attributes from | Display additional attributes below the message. Possible values List / Slack List will displays the standard list of attributes of the object triggering the notification.Slack supposes that a slack XML tag is defined under presentation to specify the fields to display (will work only in upcoming iTop 3.1+) |
| User info. | Display user information (full name) below the message. Possible values: Yes / No (default) |
| Modify button | Include a button below the message to edit in iTop the object which has triggered the message. Possible values: Yes / No (default) |
| Delete button | Include a button below the message to delete in iTop the object which has triggered the message. Possible values: Yes / No (default) |
| Other actions buttons | Include transitions available in the current state below the message. Possible values: Yes / Specify / No (default) |
| Other actions codes | Specify which transitions to include as buttons below the message. Should be a comma separated list of the stimuli codes (eg. ev_reopen, ev_close) |
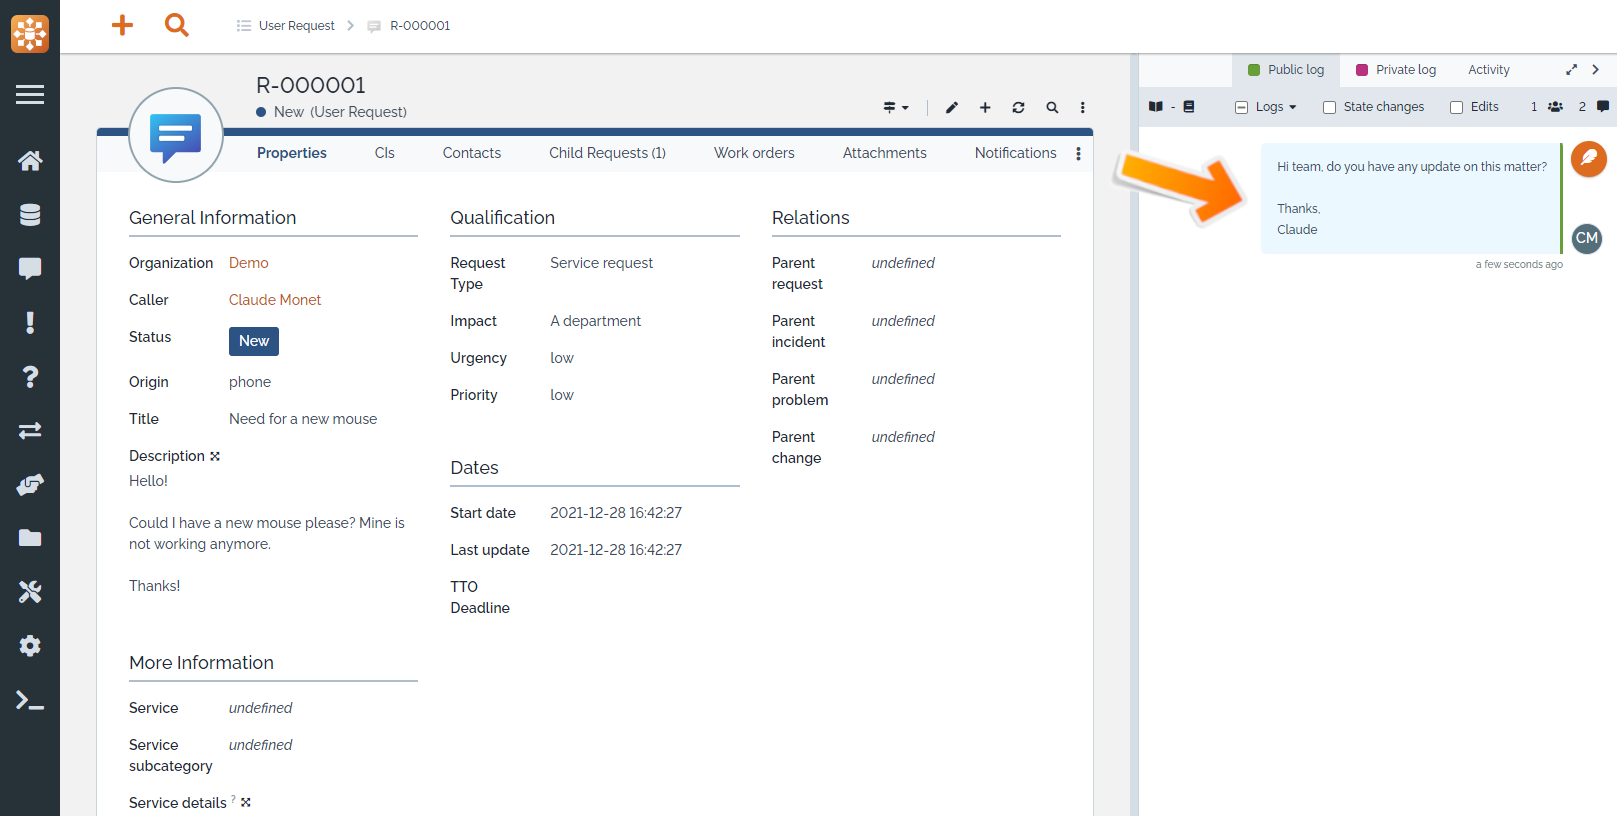
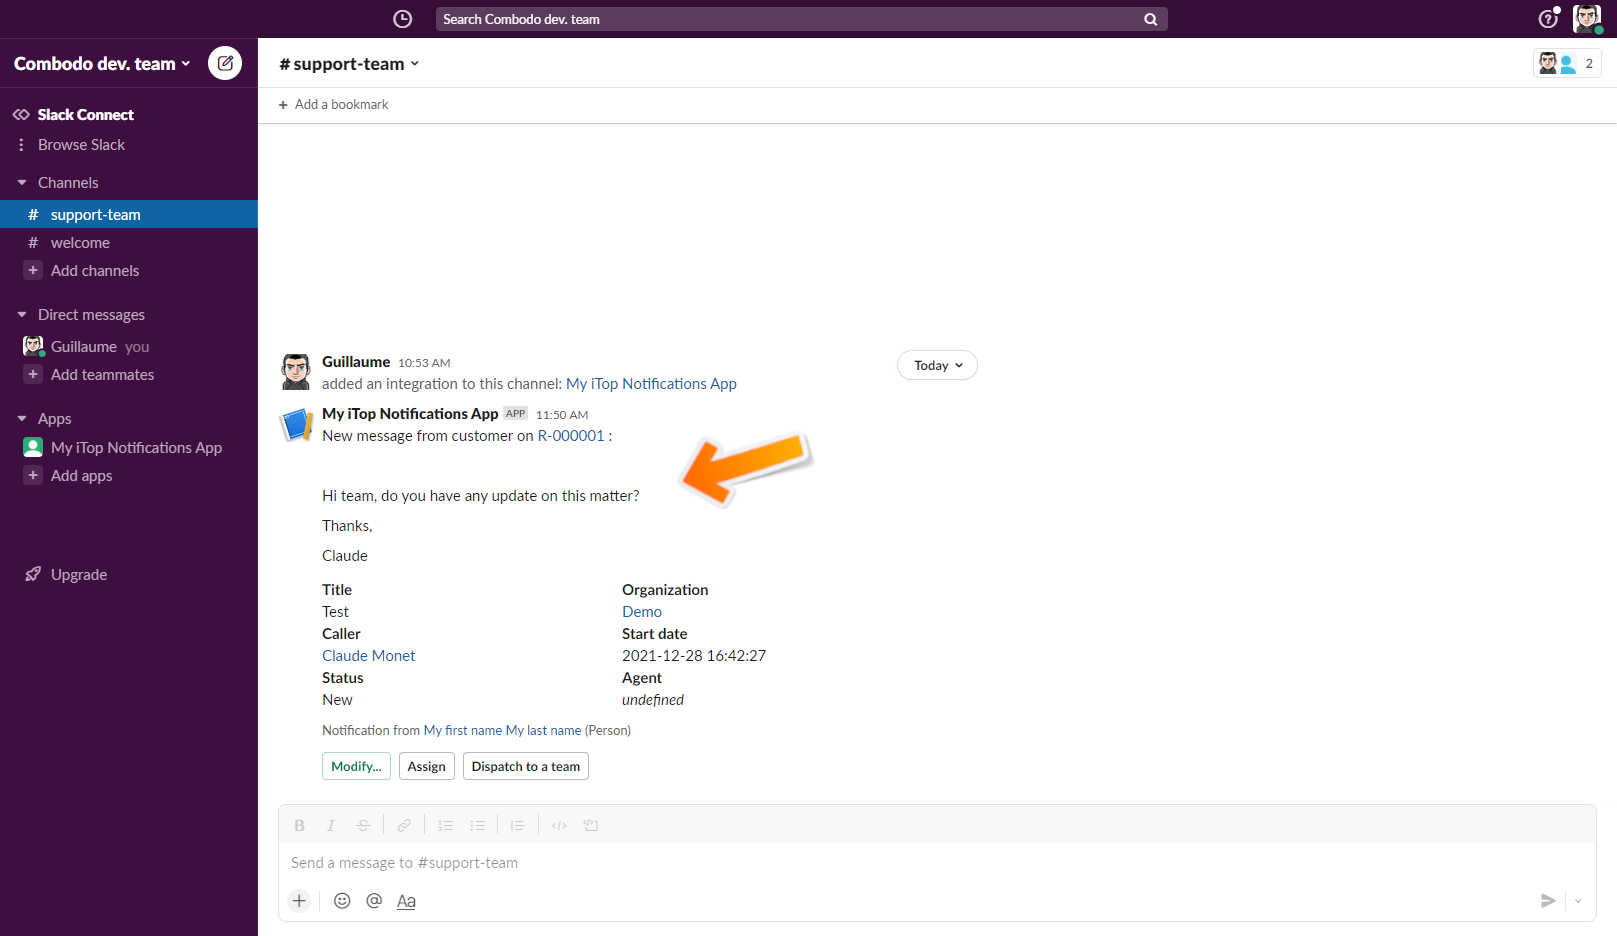
5. Test the notification
In the following example, the action is triggered by a log update on a User request.
Microsoft Teams notifications
Sending notifications to your Microsoft Teams workspace requires 3 steps:
-
Add an “incoming webhook” connector to Microsoft Teams (necessary only once per channel you want to send notifications to)
-
Add this webhook as a
Remote application connectionin iTop (necessary only once like above) -
Add the
Microsoft Teams notificationaction in iTop
Microsoft Teams full documentation is available here
1. Add an "incoming webhook" connector to Microsoft Teams
Note: This step is optional if you already configured a webhook to the same desired channel.
In Teams, open the chanel you want to create to webhook for. Then click on “Connectors” in the top right menu.

Look for “Incoming Webhook” and click “Configure” to configure a new one.
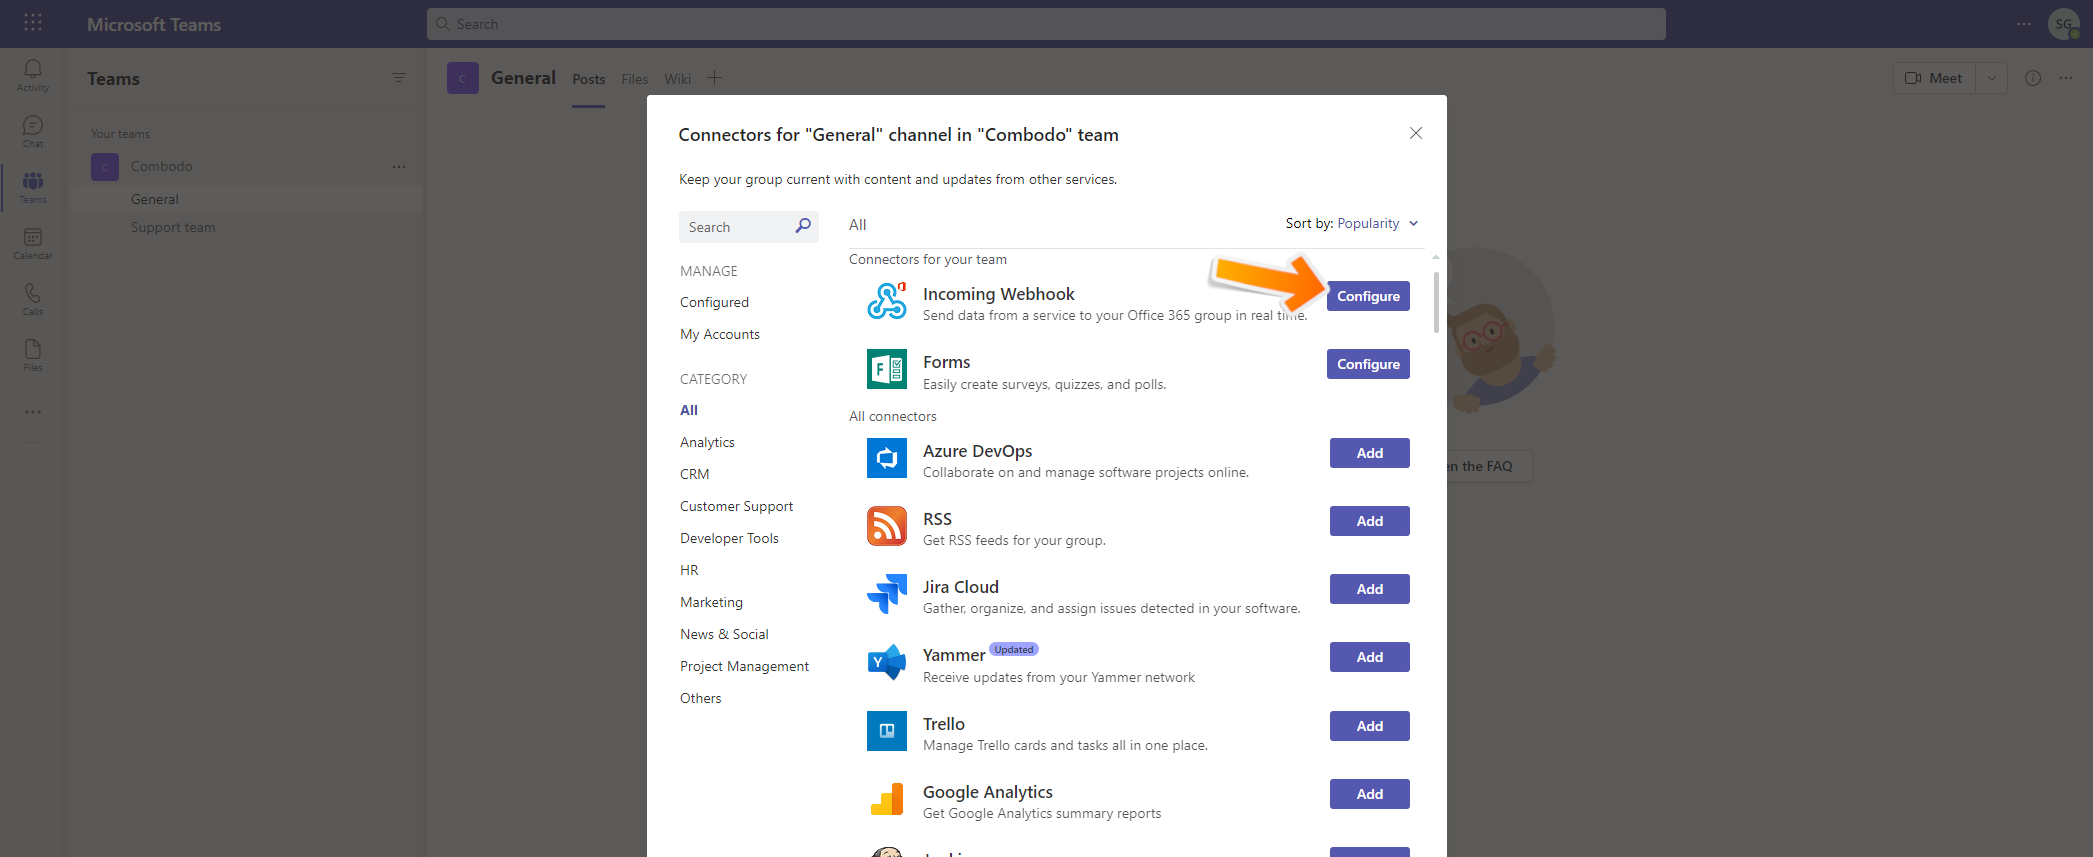
Give a name and optionally an image that will be displayed for messages of that webhook. \ Once added, copy the webhook URL and go back to your iTop

2. Add a "Remote application connection" in iTop
Note: This is step is optional is you already configured a webhook to the same desired channel.
In your iTop, create a new Remote application connection and fill the attributes:
-
Application type: Just for documentation / information
-
Environment: Just for documentation / information
-
URL: The webhook URL retrieved from the previous step. It is possible to use $this placeholder. For instance if the webhook is triggered by a ticket $this→team_id→attribute$

3. Add a "Microsoft Teams notification" action in iTop
In your iTop, create a new Microsoft Teams notification action.
-
Select the connection created in the previous step
-
Prepare the message to send in Microsoft Teams
-
Choose some extra options (hover on their labels to have details on their purpose)
-
Link at least one
Triggerlike for any other action
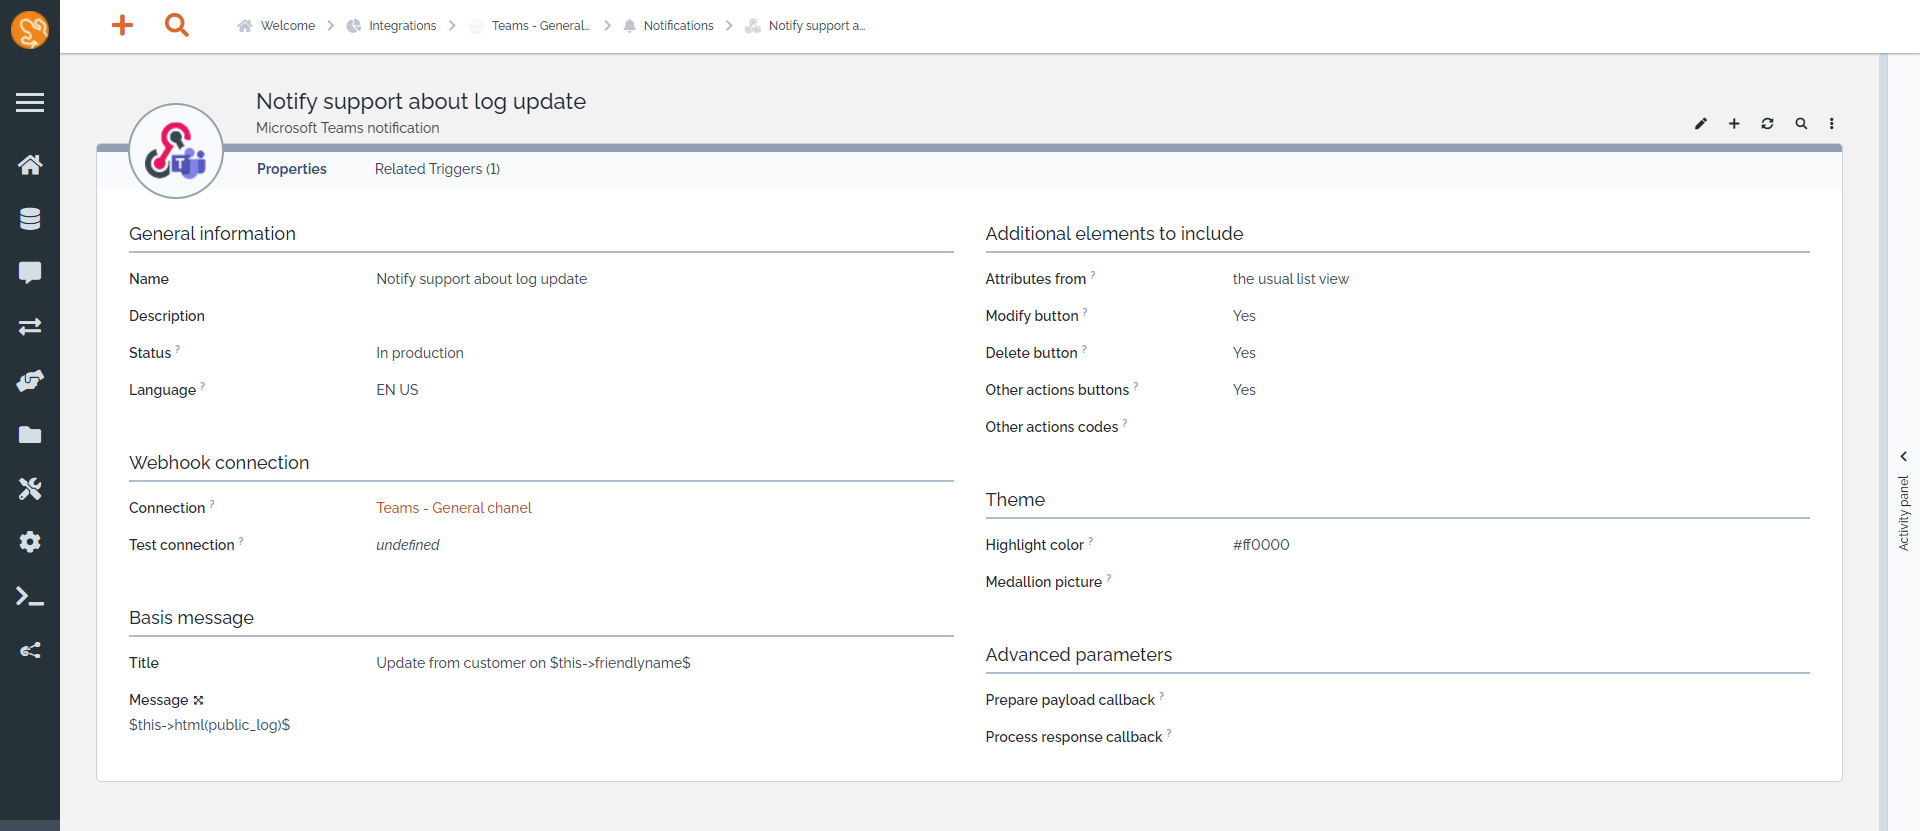
Description of the available attributes
| Microsoft Teams notification | Purpose |
|---|---|
| Name | Free text to identify this particular notification |
| Description | Free text to describe this action |
| Status | To dis-activate this notification |
| Language | Just for documentation / information |
| Connection | This reference the URL, connection method,… to use for this notification |
| Test connection | This reference the URL, connection method,… to use for this notification when in Test status |
| Title | Title of the new conversation in Teams. You can use standard Notification placeholders |
| Message | Text which will be written in Slack. You can use standard Notification placeholders |
| Attributes from | Display additional attributes below the message. Possible values List / MS Teams List will displays the standard list of attributes of the object triggering the notification.MS Teams supposes that a msteams XML tag is defined under presentation to specify the fields to display (will work only in upcoming iTop 3.1+) |
| User info. | Display user information (full name) below the message. Possible values: Yes / No (default) |
| Modify button | Include a button below the message to edit in iTop the object which has triggered the message. Possible values: Yes / No (default) |
| Delete button | Include a button below the message to delete in iTop the object which has triggered the message. Possible values: Yes / No (default) |
| Other actions buttons | Include transitions available in the current state below the message. Possible values: Yes / Specify / No (default) |
| Other actions codes | Specify which transitions to include as buttons below the message. Should be a comma separated list of the stimuli codes (eg. ev_reopen, ev_close) |
| Highlight color | Color of the highlight color line on top of the conversation. Must be a valid hexadecimal color |
5. Test the notification
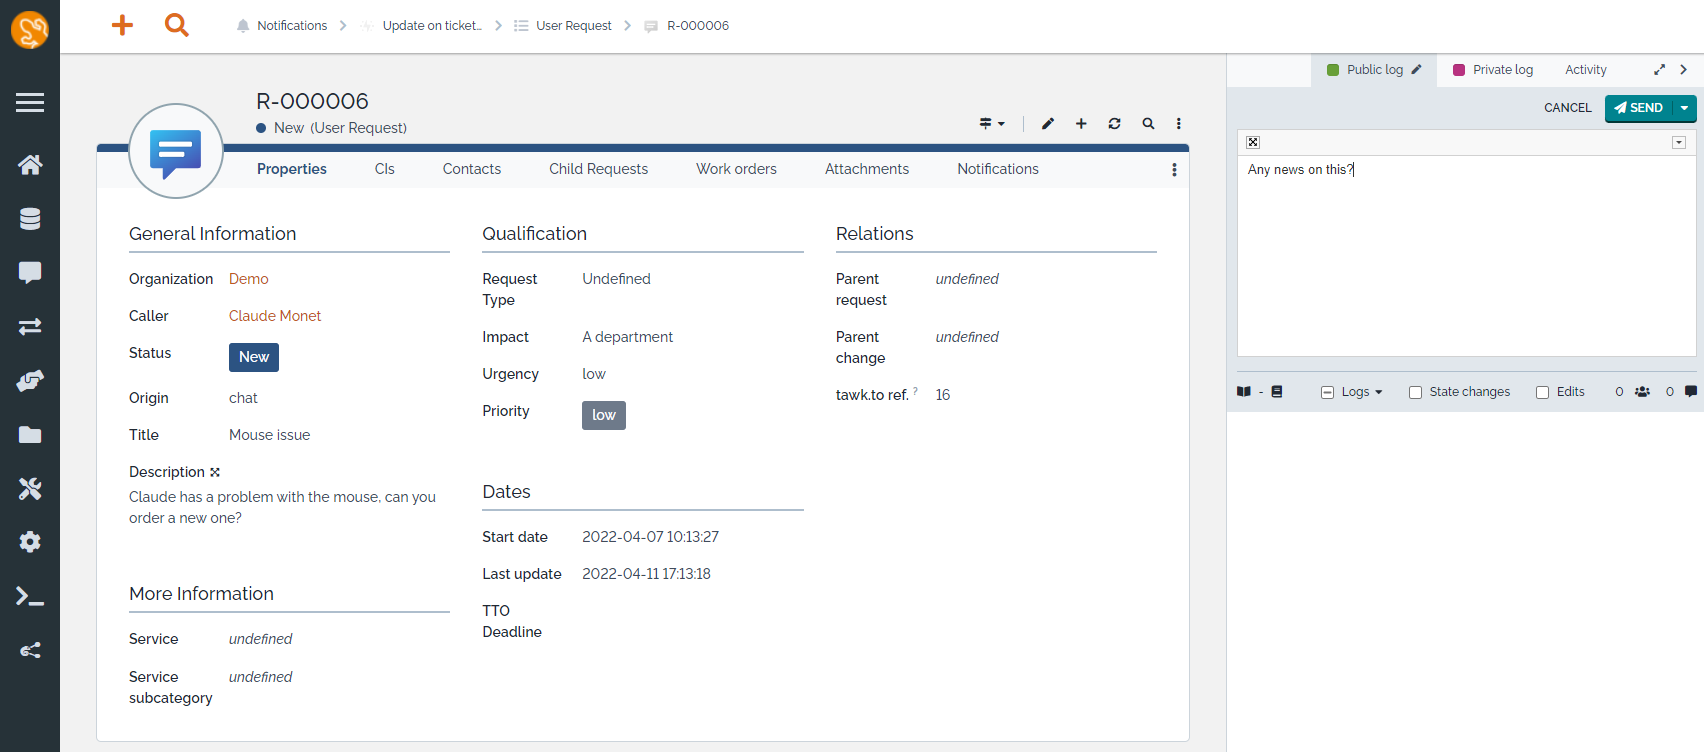
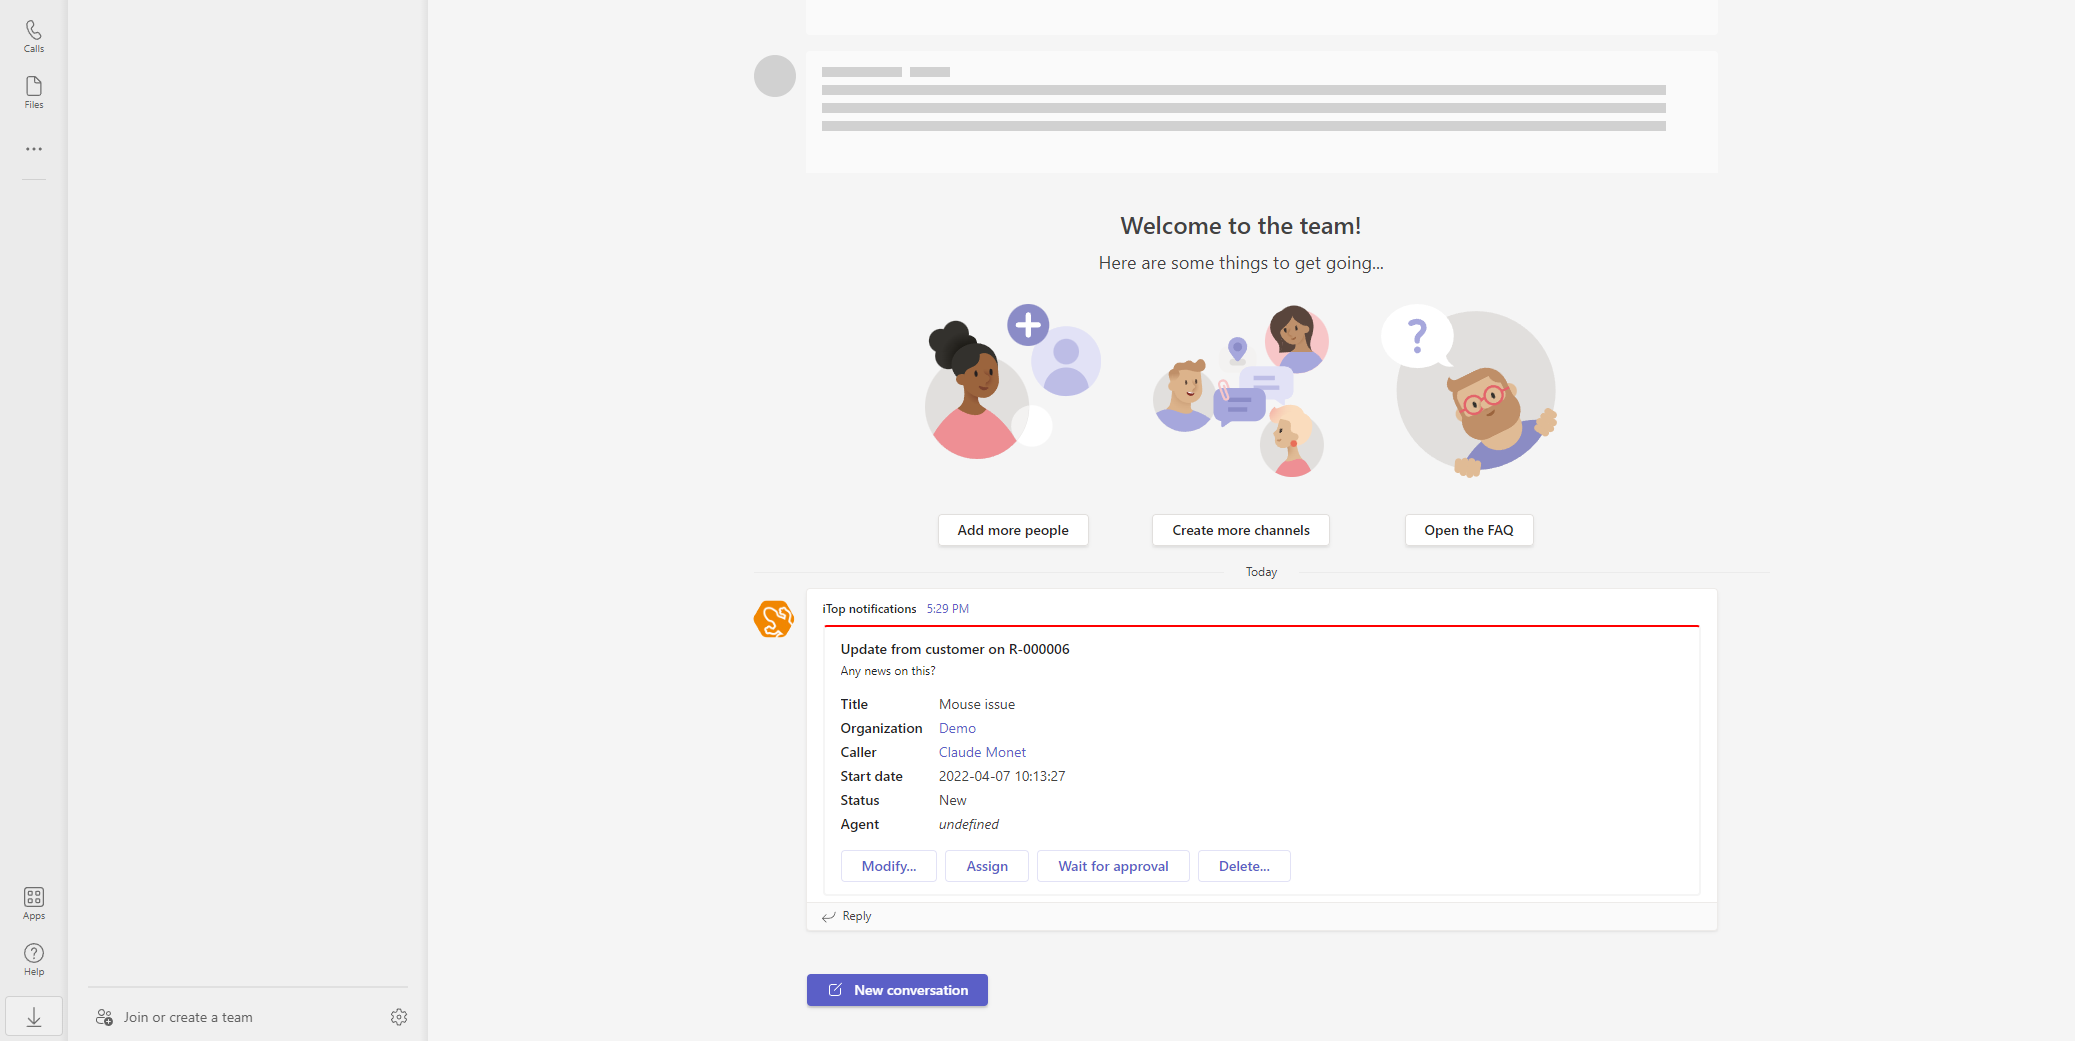
In the following example, the action is triggered by a log update on a User request.
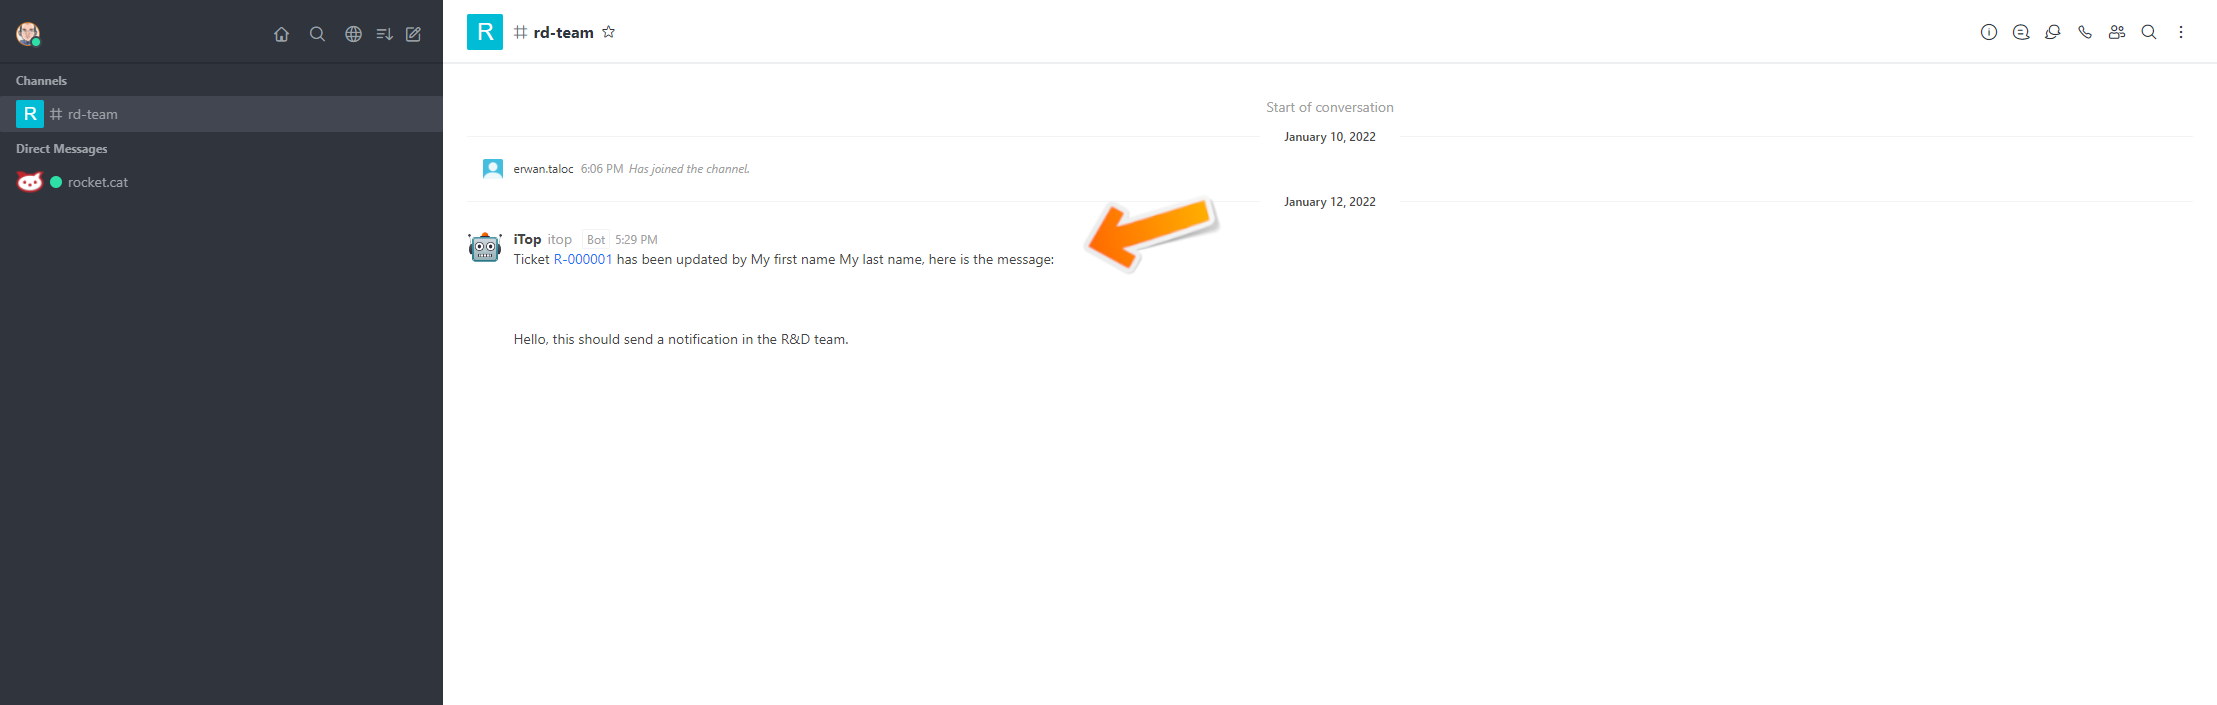
Rocket.Chat notifications
Sending notifications to your Rocket.Chat application requires 3 steps:
-
Add an “incoming webhook” to the Rocket.Chat app (necessary only once per channel / user you want to send notifications to)
-
Add this webhook as a
Remote application connectionin iTop (necessary only once like above) -
Add the
Rocket.Chat notificationaction in iTop
Rocket.Chat full documentation is available here
1. Add an "incoming webhook" to the Rocket.Chat app
Note: This step is optional if you already configured a webhook to the same desired channel / user.
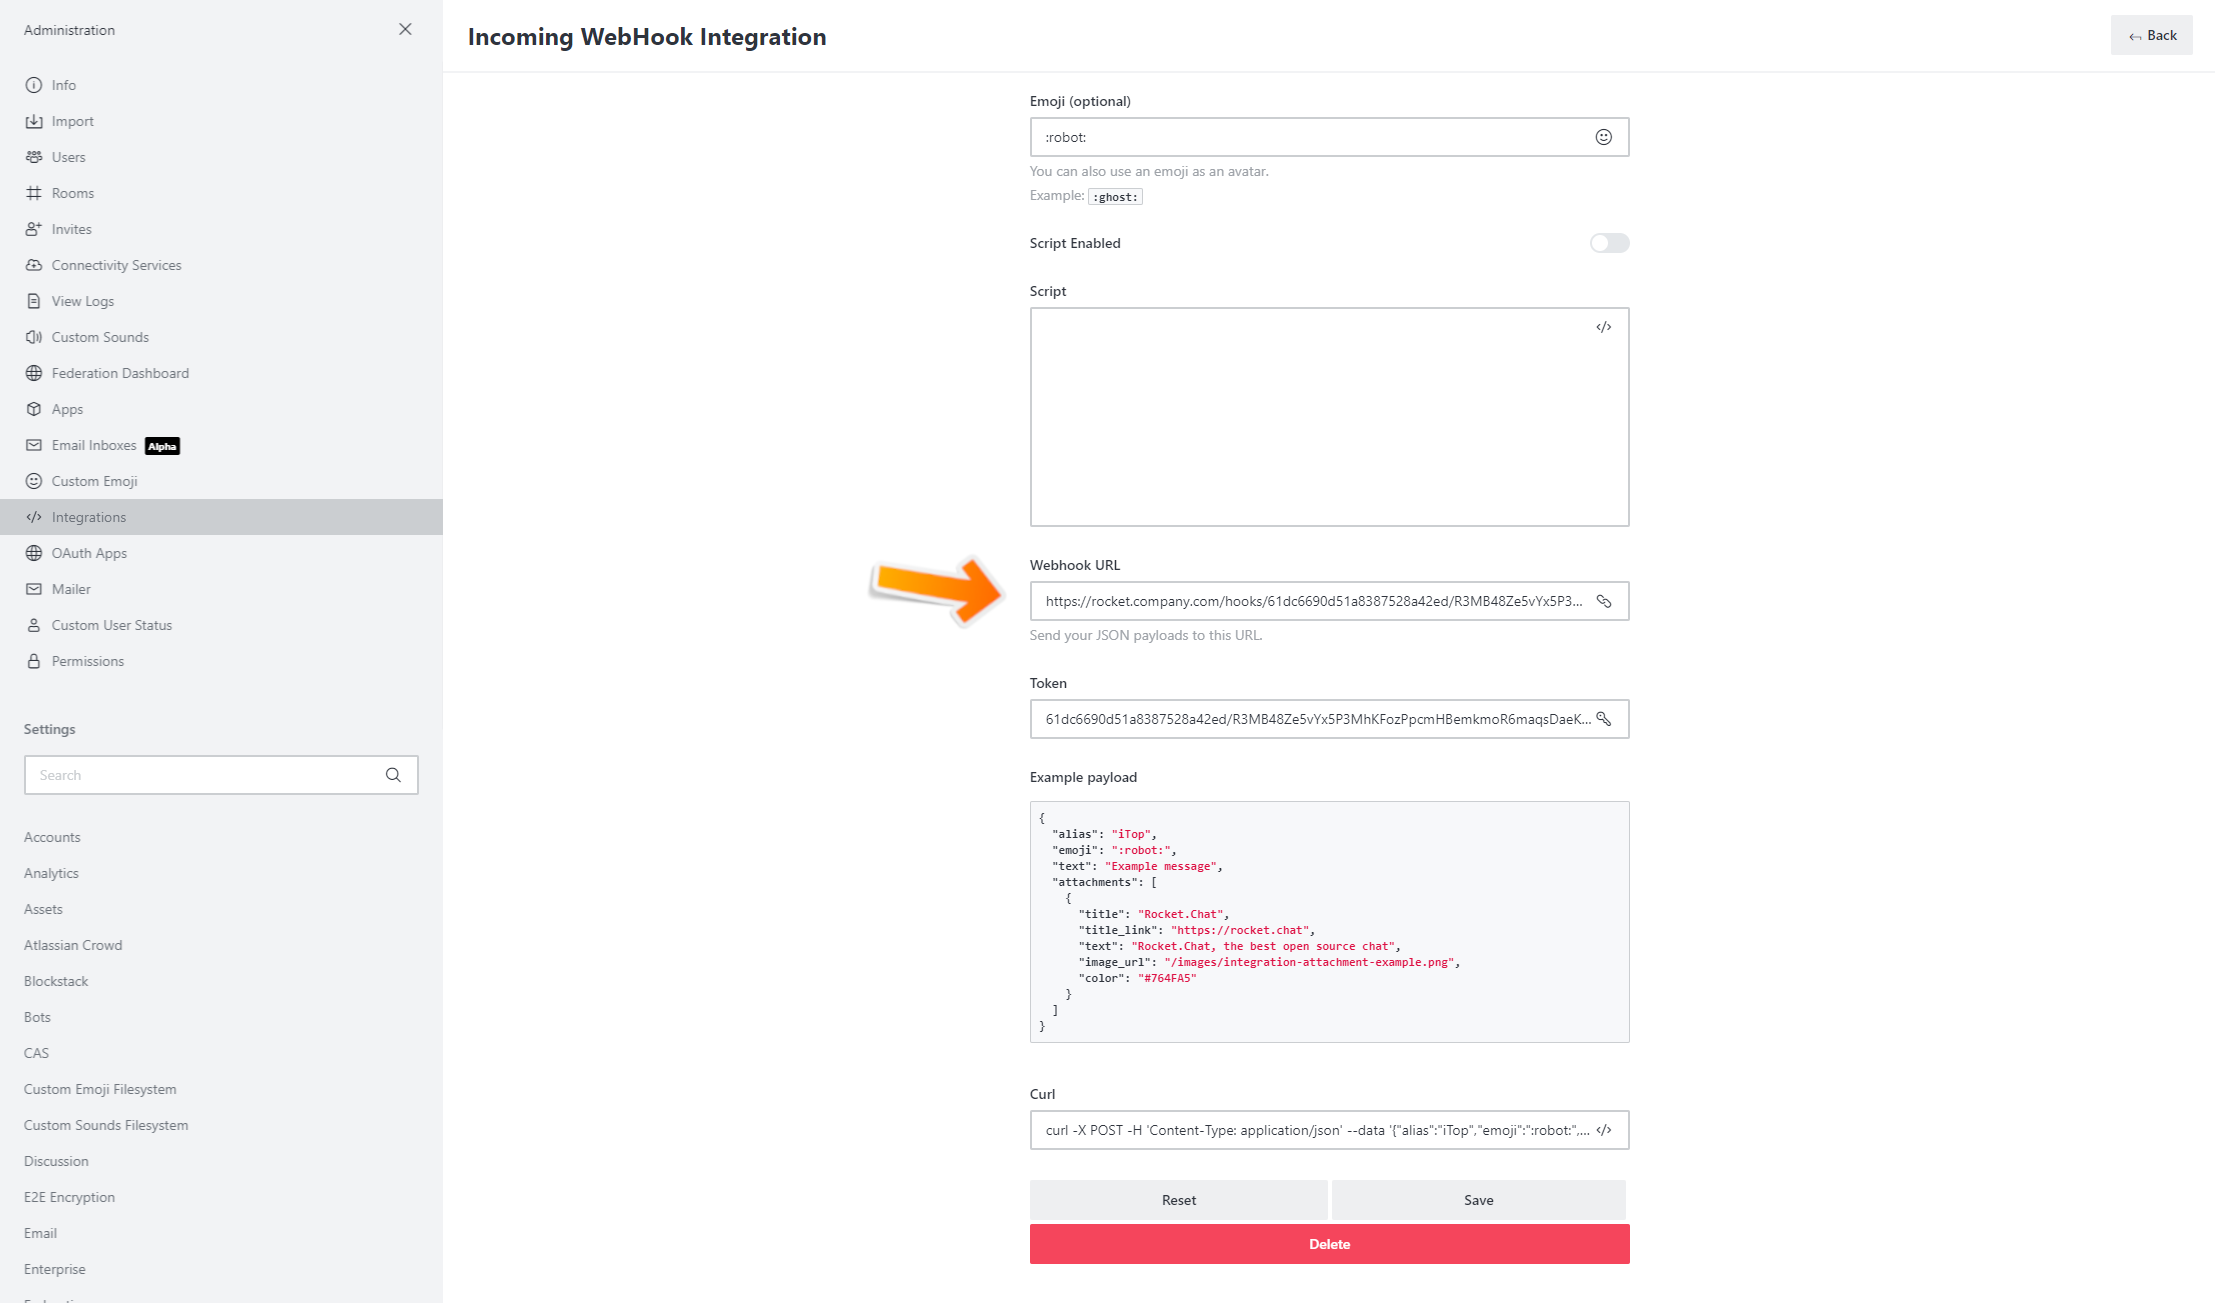
With an administrator account, open the “Administration” menu then the “Integrations” section and create a new “Incoming” integration.
Enable it and fill at least the following:
-
Post to Channel: Where you want to send notifications. Don't forget to start with “#” or “@” depending on if its a channel or user. -
Post as: ID of the user that will be used to send the notification, must be a valid / existing one. -
Alias,Avatar URLandEmojiallow you to override the corresponding attributes of the “Post as” user.

Once created, copy the “Webhook URL” and go back to your iTop instance.
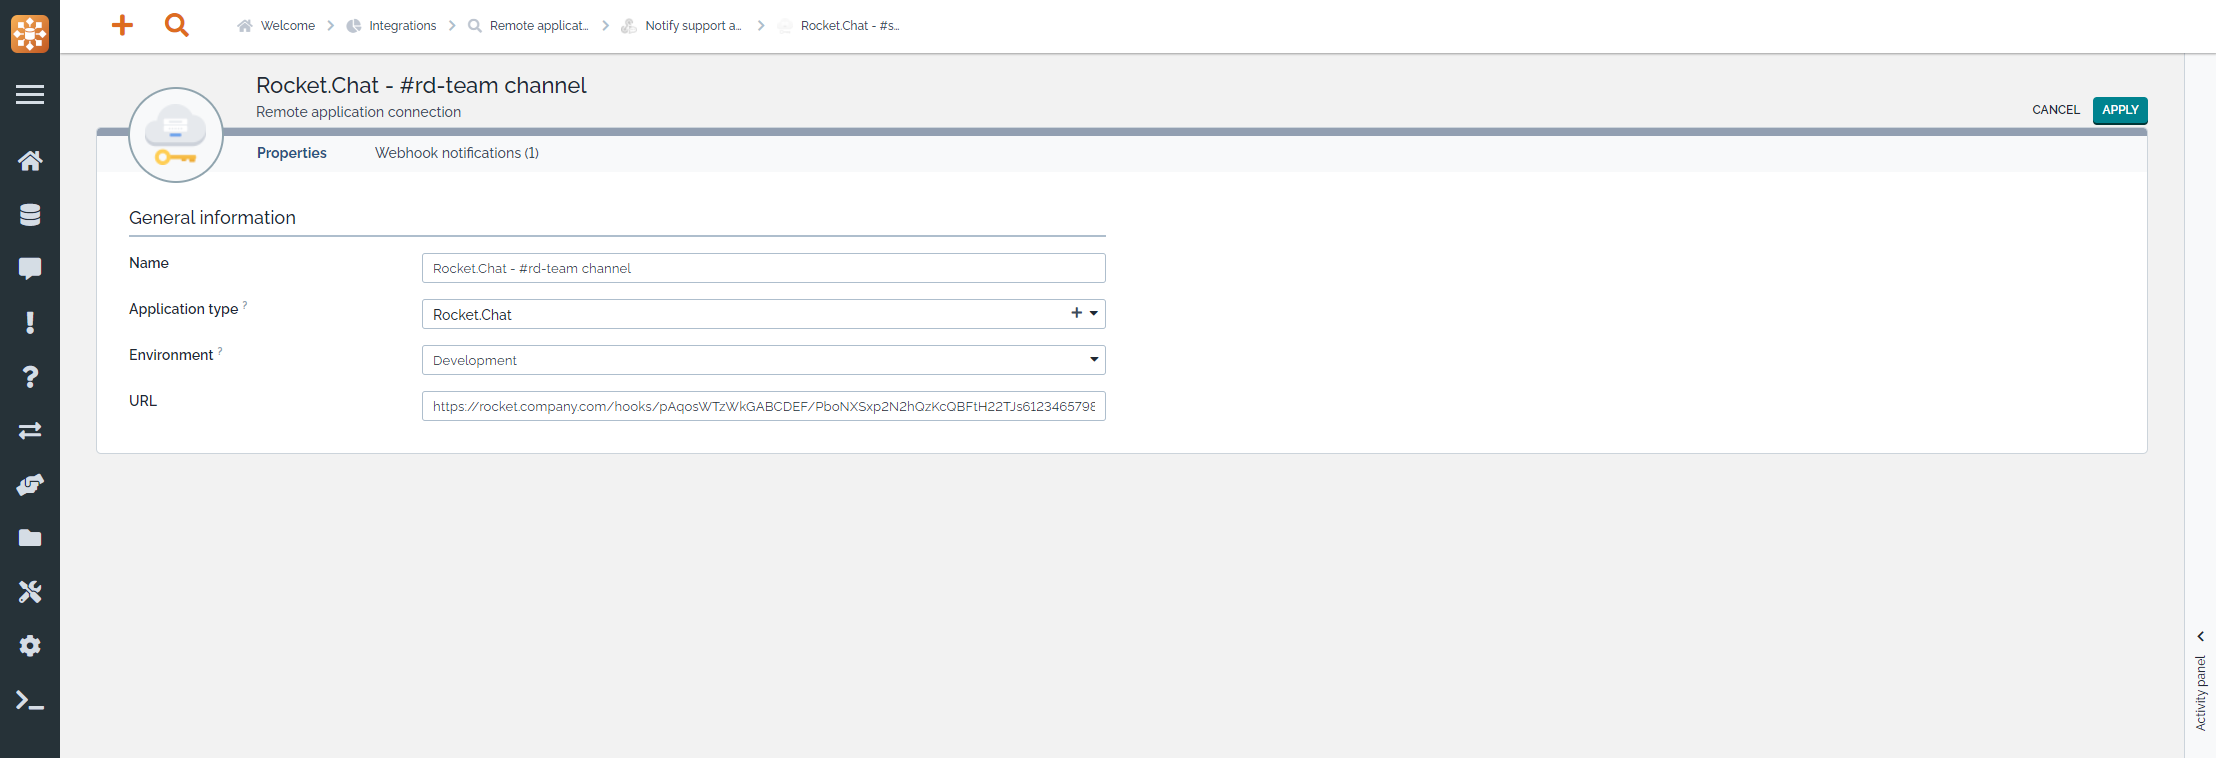
2. Add a "Remote application connection" in iTop
Note: This is step is optional is you already configured a webhook to the same desired channel / user.
In your iTop, create a new Remote application connection and fill the attributes:
-
Application type: Just for documentation / information
-
Environment: Just for documentation / information
-
URL: The webhook URL retrieved from the previous step. It is possible to use $this placeholder. For instance if the webhook is triggered by a ticket $this→team_id→attribute$
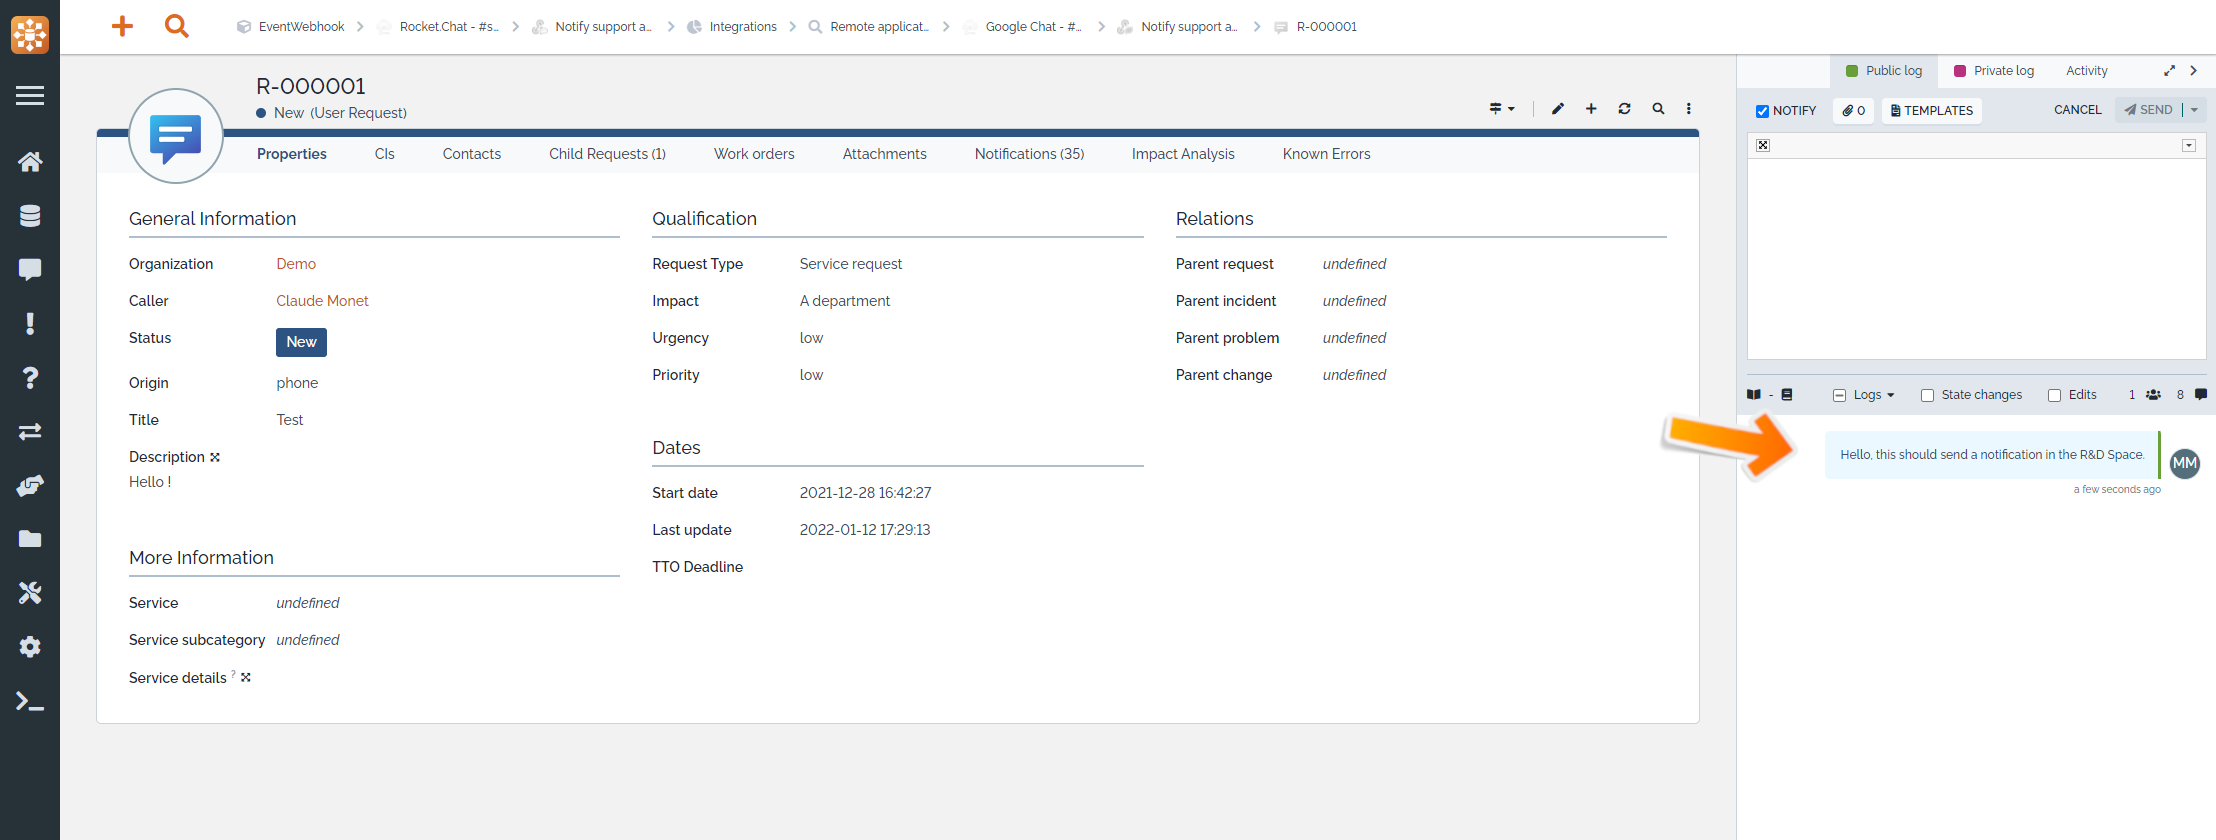
3. Add a "Rocket.Chat notification" action in iTop
In your iTop, create a new Rocket.Chat notification action.
-
Select the connection created in the previous step
-
Prepare the message to send in Rocket.Chat
-
Choose some extra options (hover on their labels to have details on their purpose)
-
Link at least one
Triggerlike for any other action
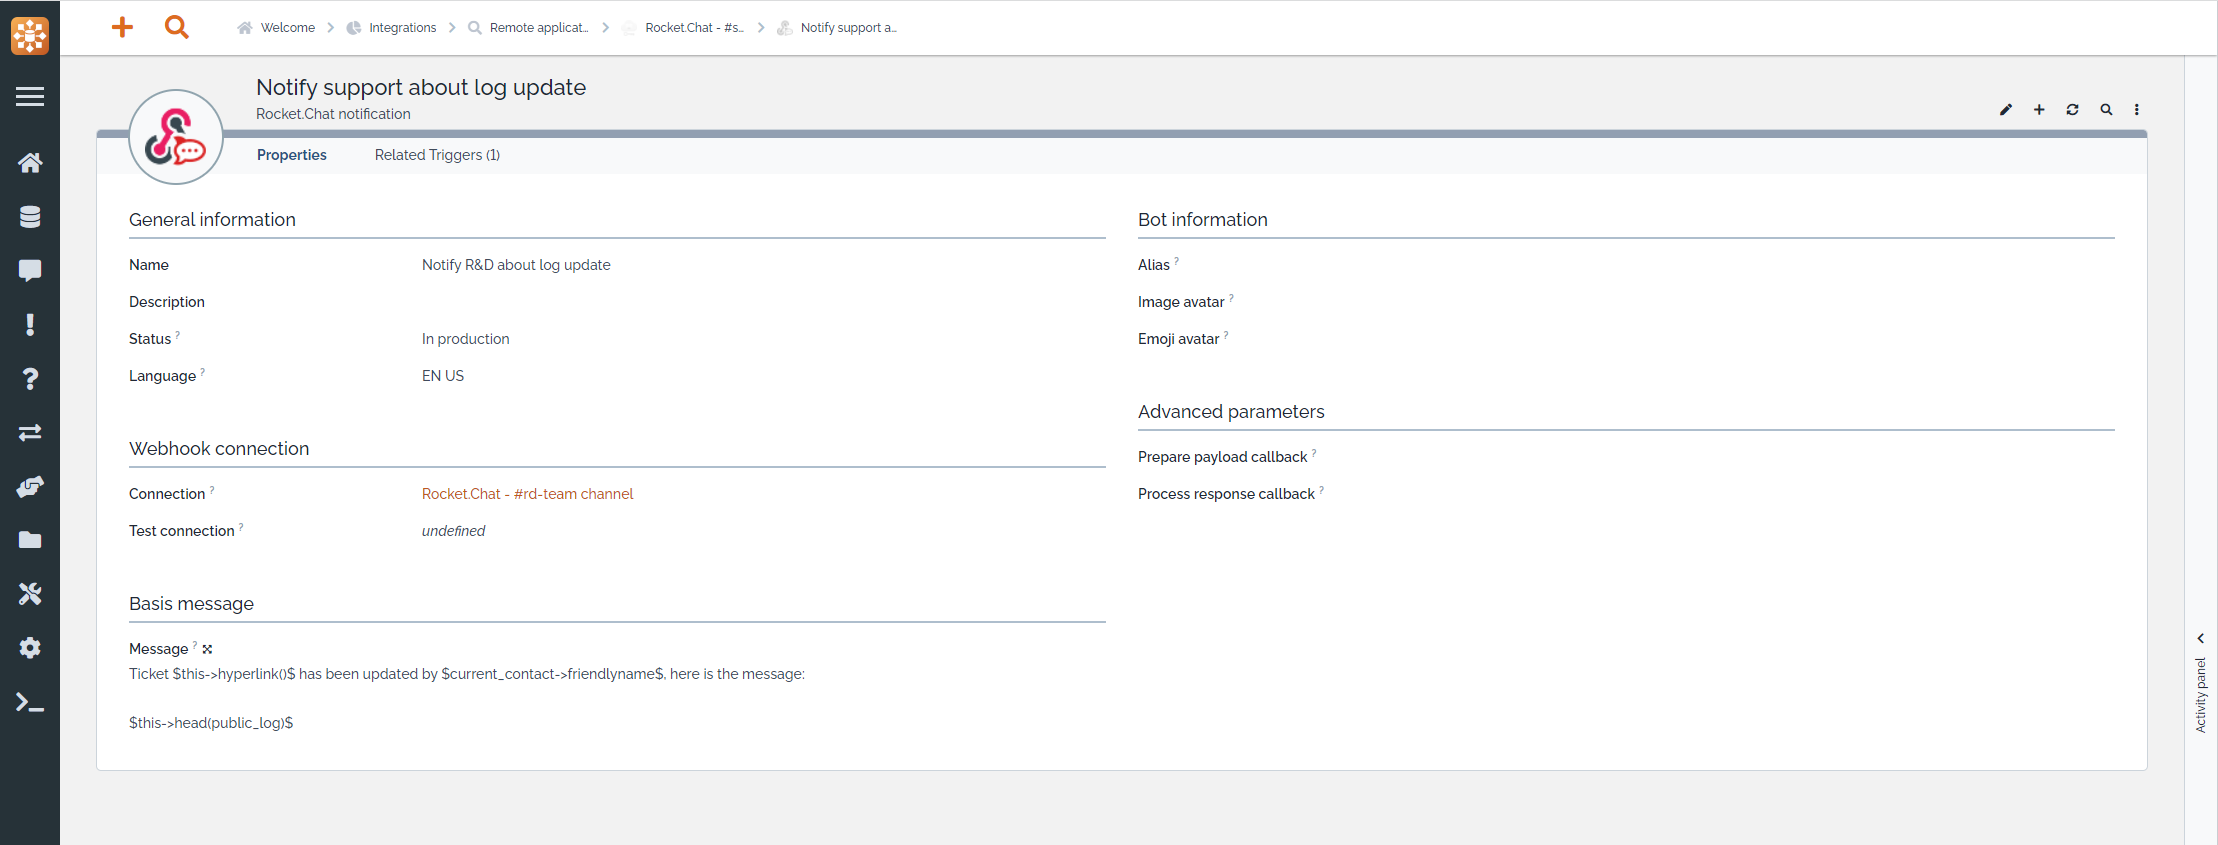
Description of the available attributes
| Rocket.Chat notification | Purpose |
|---|---|
| Name | Free text to identify this particular notification |
| Description | Free text to describe this action |
| Status | To dis-activate this notification |
| Language | Just for documentation / information |
| Connection | This reference the URL, connection method,… to use for this notification |
| Test connection | This reference the URL, connection method,… to use for this notification when in Test status |
| Message | Text which will be written in Rocket.Chat. You can use standard Notification placeholders |
| Alias | Overrides for this specific action only, the Alias value of the webhook as defined in Rocket.Chat. You can use standard Notification placeholders |
| Image avatar | Overrides for this specific action only, the Image avatar value of the webhook as defined in Rocket.Chat. You can use standard Notification placeholders |
| Emoji avatar | Overrides for this specific action only, the Emoji avatar value of the webhook as defined in Rocket.Chat. You can use standard Notification placeholders |
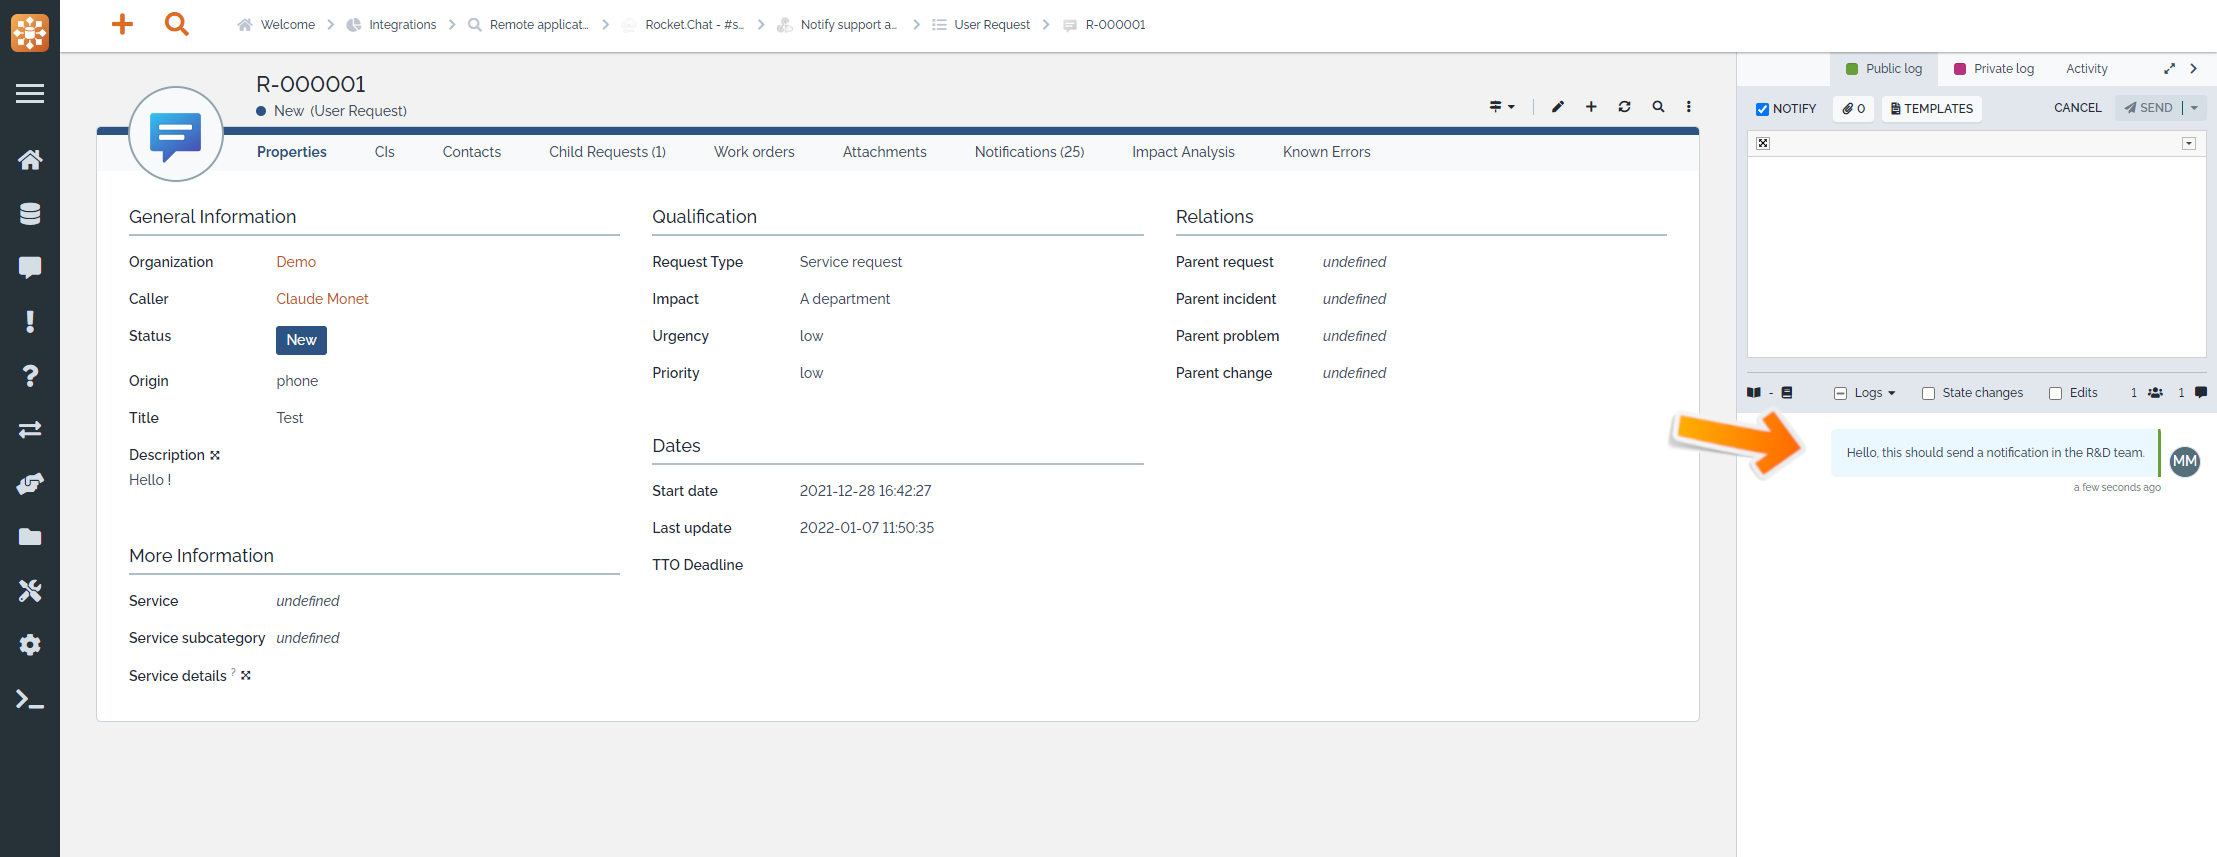
4. Test the notification
In the following example, the action is triggered by a log update on a User request.
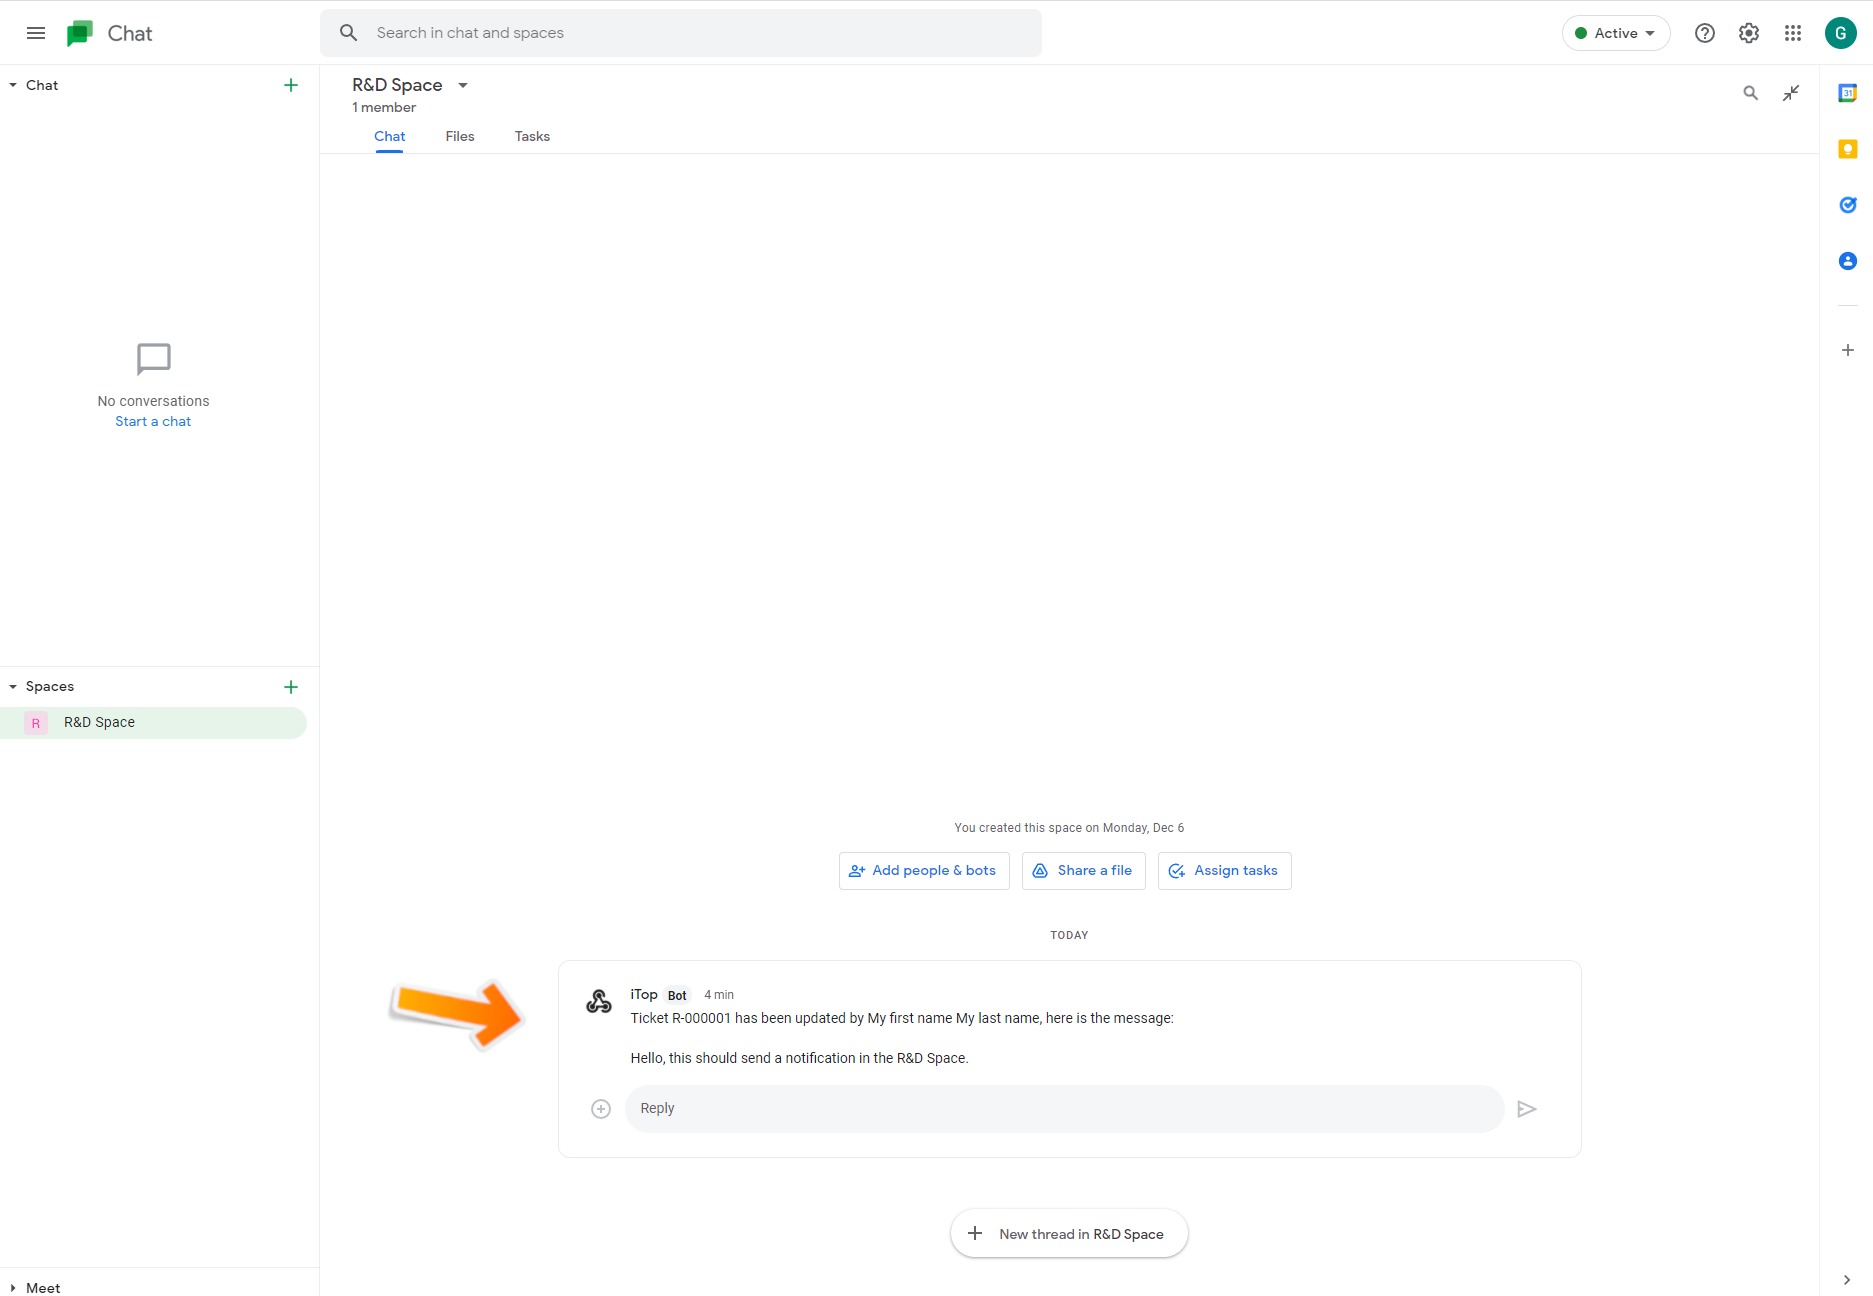
Google Chat notifications
Sending notifications to your Google Chat application requires 3 steps:
-
Add an “incoming webhook” to the Google Chat app (necessary only once per channel / user you want to send notifications to)
-
Add this webhook as a
Remote application connectionin iTop (necessary only once like above) -
Add the
Google Chat notificationaction in iTop
Google Chat full documentation is available here
1. Add an "incoming webhook" to the Google Chat app
Note: This step is optional if you already configured a webhook to the same desired channel / user.
Open the Space for which you want to add the webhook and click on “Manage webhooks”

Give it a name, save, copy the URL and go back to your iTop instance.

2. Add a "Remote application connection" in iTop
Note: This is step is optional is you already configured a webhook to the same desired channel / user.
In your iTop, create a new Remote application connection and fill the attributes:
-
Application type: Just for documentation / information
-
Environment: Just for documentation / information
-
URL: The webhook URL retrieved from the previous step. It is possible to use $this placeholder. For instance if the webhook is triggered by a ticket $this→team_id→attribute$

3. Add a "Google Chat notification" action in iTop
In your iTop, create a new Google Chat notification action.
-
Select the connection created in the previous step
-
Prepare the message to send in Google Chat. Mind that only plain text is supported for now.

Description of the available attributes
| Google Chat notification | Purpose |
|---|---|
| Name | Free text to identify this particular notification |
| Description | Free text to describe this action |
| Status | To dis-activate this notification |
| Language | Just for documentation / information |
| Connection | This reference the URL, connection method,… to use for this notification |
| Test connection | This reference the URL, connection method,… to use for this notification when in Test status |
| Message | Text which will be written in Rocket.Chat. You can use standard Notification placeholders |
4. Test the notification
In the following example, the action is triggered by a log update on a User request.
iTop webservices call
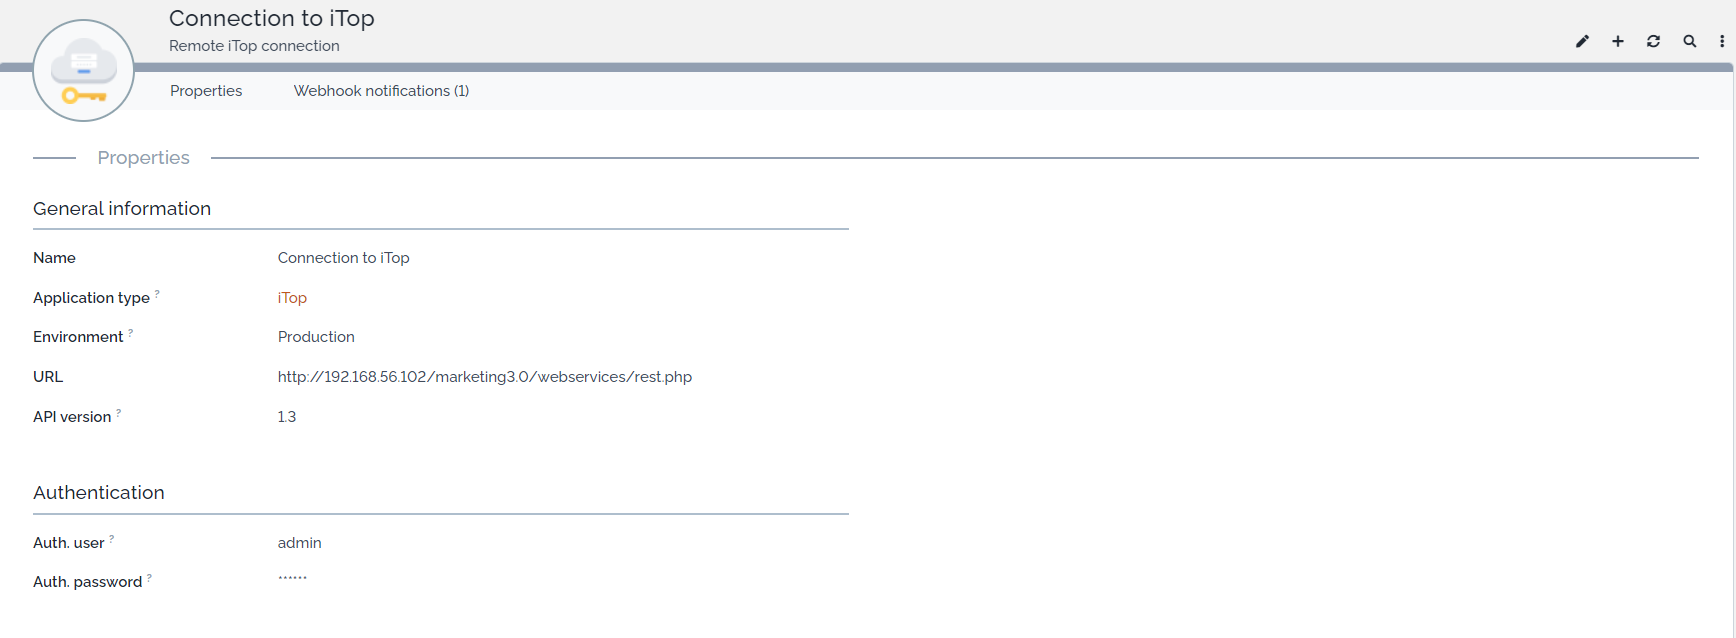
1. Add a "Remote application connection" in iTop
Note: This is step is optional is you already configured a webhook to the same desired remote iTop.
In your iTop, create a new Remote iTop connection and fill the attributes:
-
Application type: Just for documentation / information
-
Environment: Just for documentation / information
-
URL: The URL to the remote iTop, it should look like
<ITOP_APP_ROOT_URL>/webservices/rest.php. It is possible to use$thisplaceholder. For instance if the webhook is triggered by a ticket$this→team_id→attribute$ -
API version: API version of the remote iTop you want to use.
-
Auth. user: Remote iTop login to use
-
Auth. passwd: Remote iTop password to use
The user defined should have the right to use the REST/JSON API
2. Add a "iTop webhook call" action in iTop
In your iTop, create a new iTop webhook call action.
-
Select the connection created in the previous step
-
Prepare the JSON payload to be used and execute on the Remote iTop. See REST/JSON Documentation for details
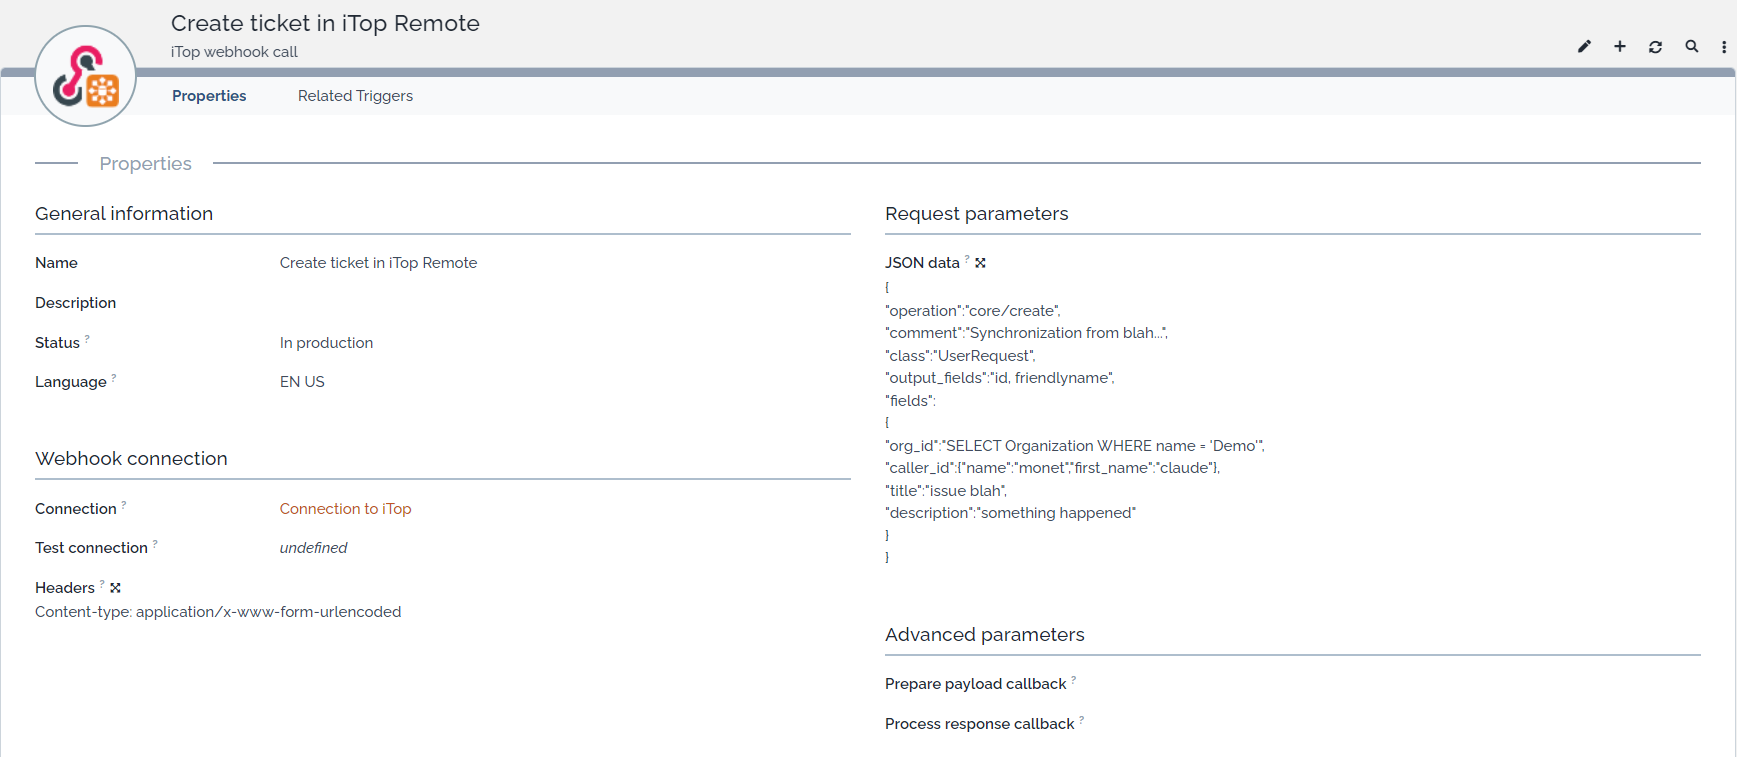
Description of the available attributes
| iTop webhook call | Purpose |
|---|---|
| Name | Free text to identify this particular action |
| Description | Free text to describe this action |
| Status | To dis-activate this notification |
| Language | Just for documentation / information |
| Connection | This reference the URL, connection method,… to use for this notification |
| Test connection | This reference the URL, connection method,… to use for this notification when in Test status |
| Headers | headers lines to be send to the remote iTop REST/JSON API. Authentication is already managed by the connection. iTop connection uses by default Content-type: application/x-www-form-urlencoded |
| JSON Data | JSON Payload to be executed |
Then you just have to link this Action to the triggers that will call it. For instance when my ticket is entering state “pending”, we create a ticket in a remote iTop
In the JSON Data field, you can use the $this placeholder to make reference to attribute corresponding to the element that triggered the event.
For instance $this→title$
Advanced
How to call another third-party app
This chapter has to be use if you want to connect to an application using directly its REST/JSON API, and if it is not already preconfigured in iTop like Slack, Google or Rocketchat
1. Add a "Remote application connection" in iTop
In your iTop, create a new Remote application connection and fill the attributes:
-
Application type: Just for documentation / information
-
Environment: Just for documentation / information
-
URL: The url corresponding to the REST API call you want to execute . It is possible to use
$thisplaceholder. For instance if the webhook is triggered by a ticket$this→team_id→attribute$
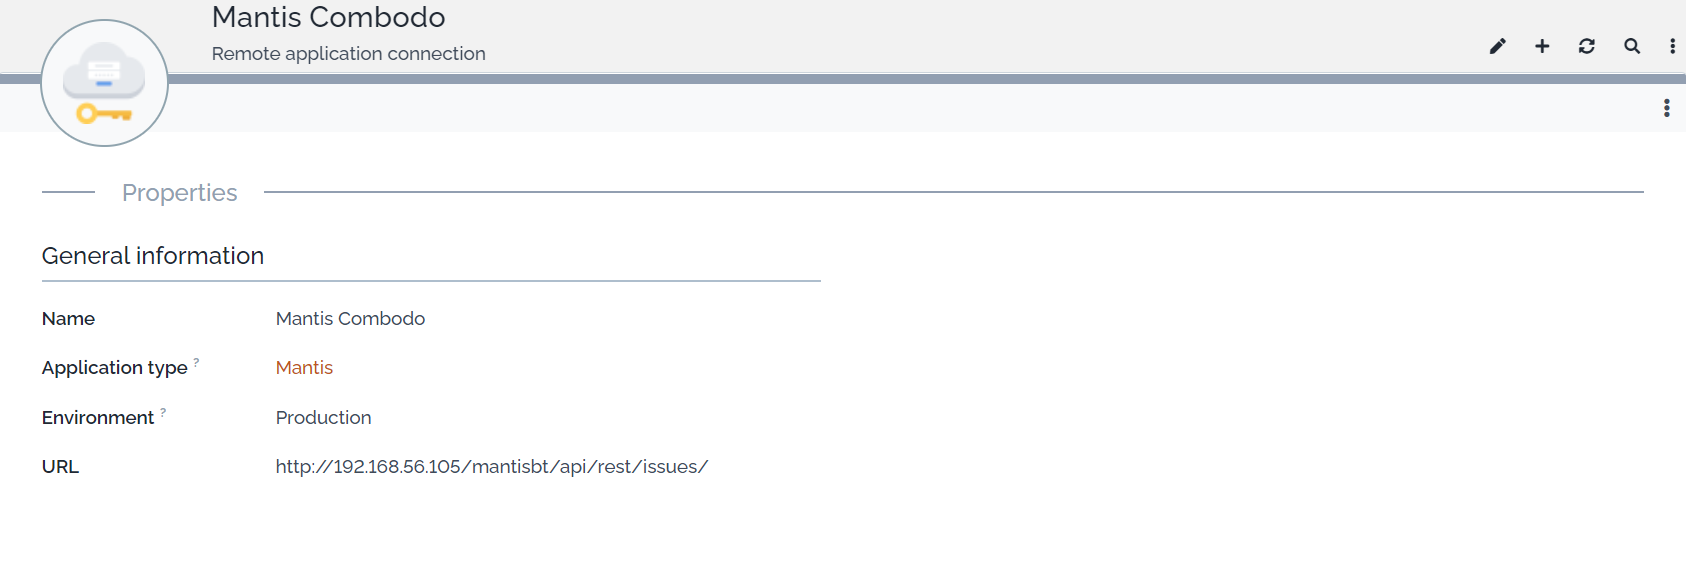
In my example above, we use a web service to create an issue in MantisBT
2. Add a "Webhook call (generic)" action in iTop
In your iTop, create a new Webhook call (generic) action.
-
Select the connection created in the previous step
-
define the header to be sent to the web server. There are used often to define the credential to be used in the Authorisation
-
Prepare the JSON payload to be used and execute on the Remote iTop. see REST/JSON Documentation for details

Description of the available attributes
| Generic action | Prupose |
|---|---|
| Name | Free text to identify this particular notification |
| Descrition | Short description for this action |
| Status | To dis-activate this notification |
| Language | Just for documentation / information |
| Connection | This reference the URL, connection method,… to use for this notification |
| Test connection | This reference the URL, connection method,… to use for this notification when in Test status |
| Headers | headers lines to be send to iTop REST/JSON API. |
| Payload | JSON Payload to be sent to the webservice corresponding to the connection |
Then you just have to link this Action to the triggers that will call it. For instance when my ticket is entering state “pending”, I create a ticket in a ManitBT
In the fields JSON Data, you can use the $this placeholder to make reference to attribute corresponding to the element that triggered the event.
For instance $this→title$
How to resend webhook on error
If you configure webhooks to be sent asynchronously, you can also configure retries on error. This can be done using the async_task_retries configuration parameters of the application. Class names to use can be found in the “Datamodel Viewer” in your iTop backoffice.
You still have unanswered questions ? Ask us.
Give, get, ask…
Join our community of users to share your knowledge and good practices.