Notifications advanced
- Available with
- Tailored
- Team
Notifications
iTop integrates a notification system linked to the lifecycle of the objects. This allows administrators to define email notification rules when an object of a given class enters or leaves a specified state, when a new object is created, when an update occurs from the portal or when certain thresholds are reached.
The notification mechanism is divided in two parts:
-
Triggers define when notifications have to be sent. Example: when a ticket reaches the state “assigned”.
-
Actions define what will be done. In the current version of iTop, the only available kind of action consist in sending an email.
For a given trigger you can define several actions to be executed, and their sequence. Also, a given action can be executed by several triggers.
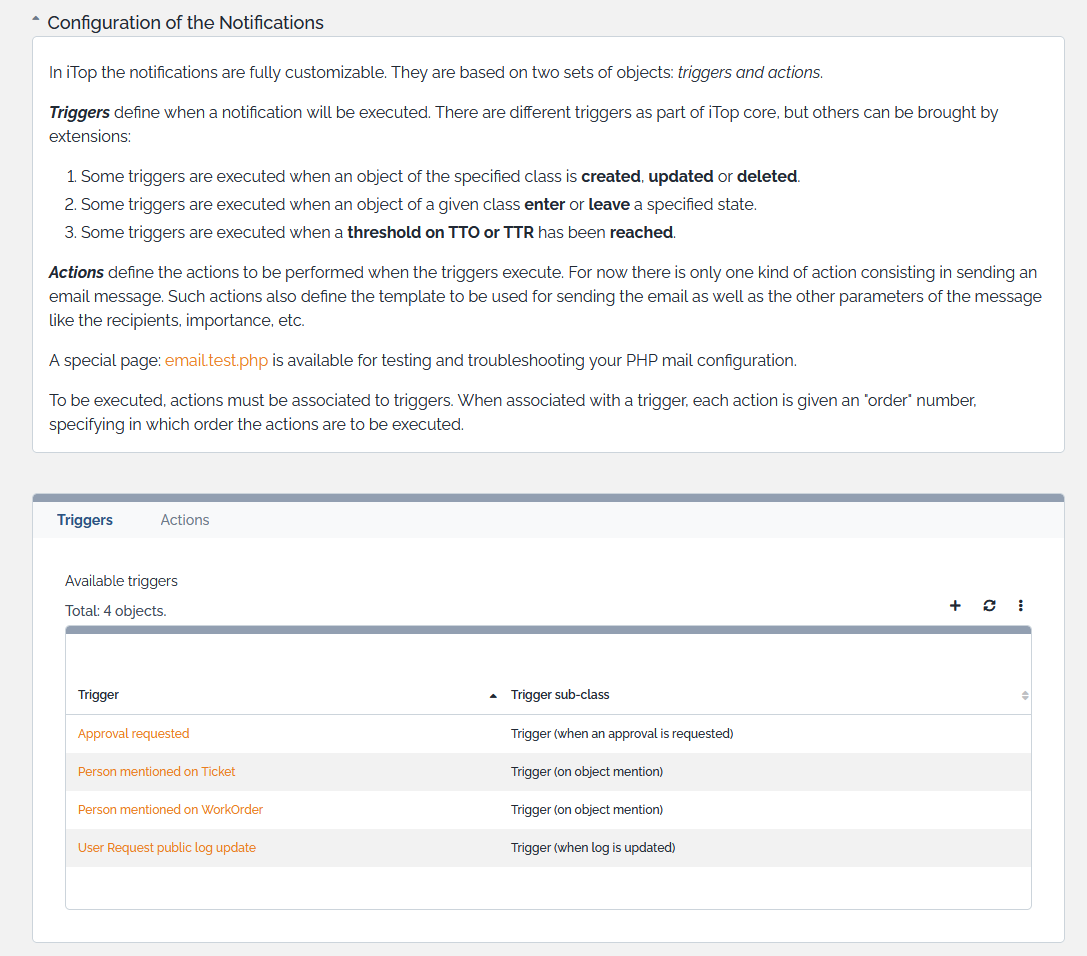
Use the link “Notifications” in the “Admin tools” menu to manage triggers and actions:
-
The “Triggers” tab displays all created triggers.
-
The “Actions” tab displays all Actions
Creating an action
Before creating an useful trigger, at least one action must be defined. Email actions are templates for formatting the messages to be sent, the define the content of the message as well that the subject, sender and recipients.
To create a new action, go to the “Actions” tab and click on “New…”. The following wizard appears:

The mandatory fields for an email action are:
-
Name: an identifier of this action, so you can retrieve it.
-
Subject: the subject of the message. May be built dynamically by using placeholders as described herebelow.
-
Body: the body of the message. May be built dynamically by using placeholders as described herebelow. By default, iTop sends all the messages with the MIME Type text/html for the body of the email.
-
From (email): Either a static email address or a placeholder like
$this->agent_id->email$. Note that some email servers will reject the message if the “from” address is not valid. -
From (label): Either a static label or a placeholder like
$this->agent_id->friendlyname$.
Of course you must specify at least one of the 3 fields which are used for the mail recipients, either To, Cc or Bcc.
Other fields:
-
Description: free text to identify the purpose of the email action. Not sent within the email message.
-
Status:
-
In production: email are sent to people retrieved by To, Cc and Bcc queries
-
Being tested: email are sent to
Test recipientemail address -
Inactive: email are not sent
-
-
Test recipient: email address used instead of To, Cc and Bcc when the status is
Being tested -
Reply to (email): Either a static email address or a placeholder like
$this->team_id->email$. This a standard attribute of an email message. It is used automatically by mailing tools as the address to use, when the user does “reply” on the email in his mailer. If omitted thefromaddress is used. -
Reply to (label): Either a static label or a placeholder like
$this->team_id->friendlyname$. This a standard attribute of an email message. It is used automatically by mailing tools as the label to use, when the user does “reply” on the email in his mailer. If omitted thefromlabel is used.
Defining recipients
The contacts to be notified in the “To”, “Cc”, and “Bcc” are defined by an OQL query. This allows to specify multiple recipients for the notification, like “all the contacts attached to a ticket” or “all the contacts on the impacted site”.
If all list returned by the OQL queries are empty no email will be sent.
Using predefined queries
The easiest mean to define who will receive those notifications is to retrieve the query using the magnifier icon and select the appropriate query
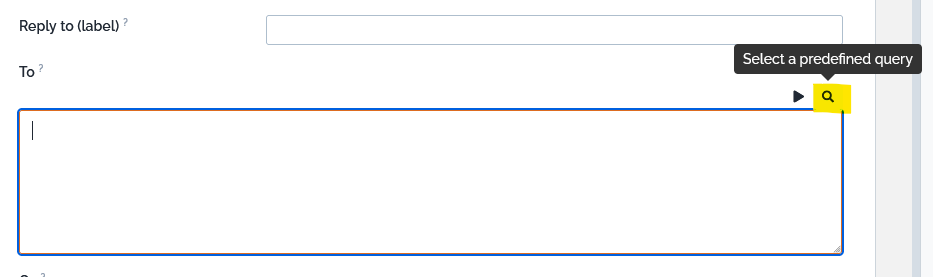

It copies the corresponding OQL in the field. You can pick up a different predefined query for each field:
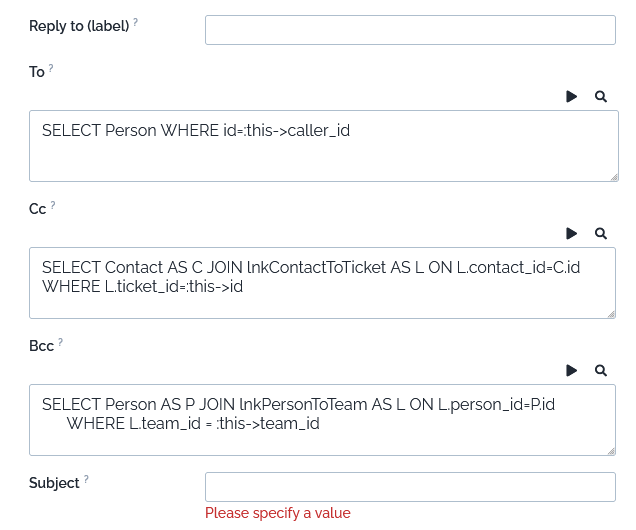 |
The caller in To:
SELECT Person WHERE id= :this->caller_id
SELECT Contact
JOIN lnkContactToTicket AS L ON L.contact_id = Contact.id
WHERE L.ticket_id = :this->id
SELECT Person AS P JOIN lnkPersonToTeam AS L ON L.person_id=P.id WHERE L.team_id = :this->team_id |
You can modify the query, if it's not 100% what you need.
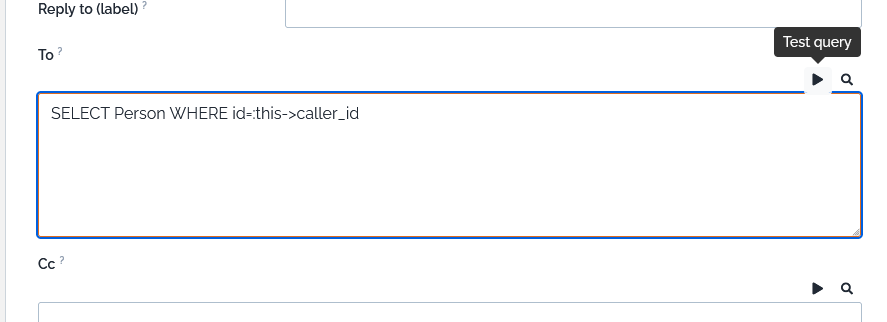
Writing your own query
You can write your own query from scratch and test it: Refer to [[FAQ:47]] for more information about writing OQL queries

This OQL query must return a list of objects containing a single email attribute, namely:
-
Contact
-
Person
-
Team
For instance, to notify all persons whose name starts with John, the To field can contain:
SELECT Person WHERE name LIKE 'John%'
To notify all the Persons attached to CIs attached to the Ticket, uses:
SELECT Person AS P
    JOIN lnkContactToFunctionalCI AS L1 ON L1.contact_id = P.id
    JOIN FunctionalCI AS CI ON L1.functionalci_id = CI.id
    JOIN lnkFunctionalCIToTicket AS L2 ON L2.functionalci_id = CI.id
    WHERE L2.ticket_id = :this->id
If you don't want to notify Persons with Notification flag set to No, add this criteria to the WHERE
Person.notify = 'yes'
Using Placeholders
The query can contain placeholders that refer to
-
the current object for which the notification is being sent. The syntax is :this->attribute.
-
the current contact which has done the action at the origin of the event. The syntax is :current_contact->attribute.
For example, to send a notification to the agent only if he did not trigger the event himself, the To field will contain:
SELECT Person WHERE id= :this->agent_id AND id != :current_contact_id
This syntax works also: :current_contact->id which is equivalent to :current_contact_id
Message contents and placeholders
The message body is edited using a WYSIWYG HTML Editor.
The “Subject” and “Body” parts can be built dynamically by using placeholders. The syntax to be used for such placeholders is $xxxx$.
| Placeholders used in … | have different syntaxe | Example |
| Recipient queries (TO, CC, BCC…) | in OQL, placeholder starts with: colon | eg. :current_contact->friendlyname |
| Message parts (subject, body) | in HTML text, placeholder starts and ends with $ | eg. $current_contact->friendlyname$ |
There are several types of placeholders:
-
$CONSTANT$refers to a fixed value named constant. -
$this->function()$refers to a built-in function executed within the context of the object that triggered the action. -
$this->attribute$refers to the field attribute of the object that triggered the action. -
$this->attribute_external_key->attribute$refers to the field attribute of the object pointed by attribute_external_key it-self being a field of the object that triggered the action. -
$this->representation(attribute)$refers to a built-in representation of the field attribute of the object that triggered the action. Ex:$this->html(name)$.
Check here the details of those various types of placeholders
Testing notifications
To test a new action, you can use the status “Being tested” and fill “Test recipient” with a test address. In that case, the notification will be sent to this latter address. Once the notification has been tested, change its status to “In Production” to have notifications flow to their actual recipients.
If you want to de-activate an action, just set its status to “Inactive”.
Creating a trigger
To create a new trigger, click on “New” in action drop down list for the given category in “Trigger” tab. The following wizard appears:
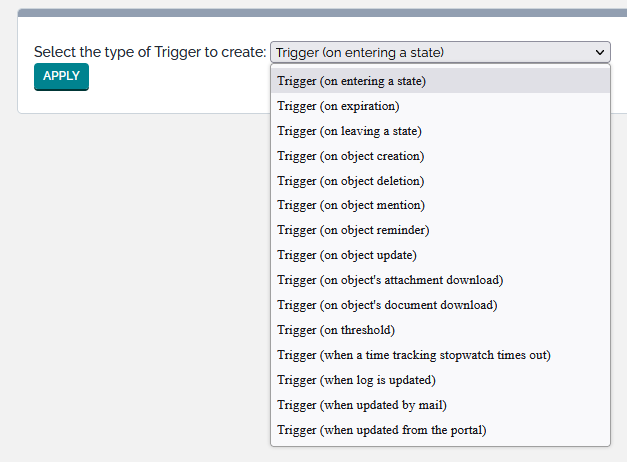
You have to select which type of trigger you want to create:
-
When an object enters in a given state = Trigger (on entering a state)
-
When an object leaves a given state = Trigger (on leaving a state)
-
When a new object is created = Trigger (on object creation)
-
When an object is deleted = Trigger (on object deletion)
-
When an object is mentioned in a log = Trigger (on object mention)
-
When an object is modified = Trigger (on object update)
-
When a given threshold for a Time-To-Resolve (TTR) or a Time-To-Own (TTO) is reached = Trigger (on threshold)
-
When a Ticket need to be approved = Trigger (when an approval is requested)
-
When a log is updated in the Console = Trigger (when log is updated)
-
When a log is updated by an email = Trigger (when updated by mail)
-
When an object is updated from the iTop portal = Trigger (when updated from the portal)
The last three can be replaced by Trigger (on object update) combined with the context and fields
More Triggers can be added by other extensions. For eg. Notify On Expiration
Once you have selected the type of trigger you get the following form:
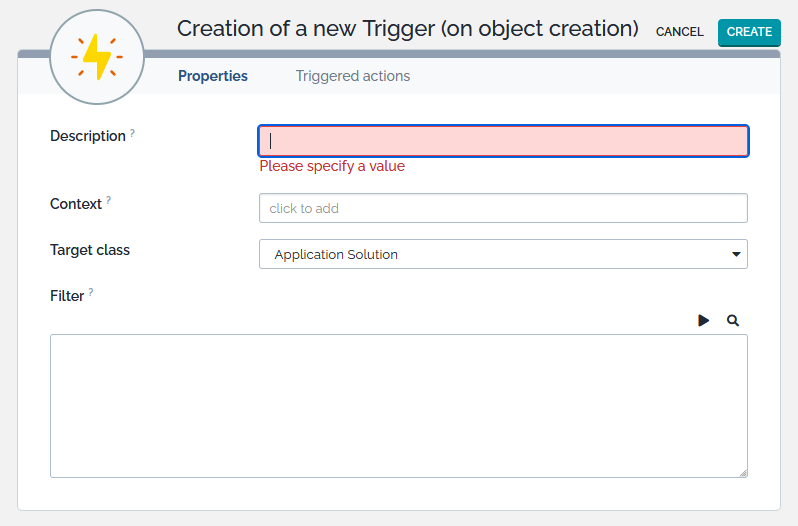
Common fields
Any type of trigger requires you to specify three parameters:
-
Description is left to you to further identify the purpose of this trigger.
-
Target class defines the class of object for which this trigger is applicable.
-
Filter restricts the objects to which the trigger applies. It is an OQL query returning all the objects that would activate the trigger. Leaving it blank means: all the objects of the expected class.
Filter
The OQL filter should not make any reference to the current object, it is useless and not working. When the OQL will be executed, iTop will check if the current object is part of the scope.
Example: User Requests requested by a caller, himself part of the team in charge of delivering Tickets on that service subcategory (Be cautious, this is a non-standard datamodel, also a meaningful one!)
Non-working examples:
SELECT UserRequest AS u
  JOIN ServiceSubcategory AS s ON u.servicesubcategory_id = s.id
  JOIN Team AS t ON s.delivery_team_id = t.id
  JOIN lnkPersonToTeam AS lnk ON lnk.team_id = t.id
 WHERE lnk.person_id = :this->caller_id
There is no need to add any condition on the current object.
Correct examples:
SELECT UserRequest AS u
  JOIN ServiceSubcategory AS s ON u.servicesubcategory_id = s.id
  JOIN Team AS t ON s.delivery_team_id = t.id
  JOIN lnkPersonToTeam AS lnk ON lnk.team_id = t.id
 WHERE lnk.person_id = u.caller_id
iTop will add AND u.id=:this→id maybe not as such, but with the exact same result.
If you want to trigger a notification limited to Ticket created by email, use origin='mail' in the Trigger Filter.
Contexts
Contexts allow you to specify in which contexts, the trigger should be activated.
-
Warning: some contexts are not available on Trigger (A specific Datasynchro or a particular CRON Task cannot be specified)
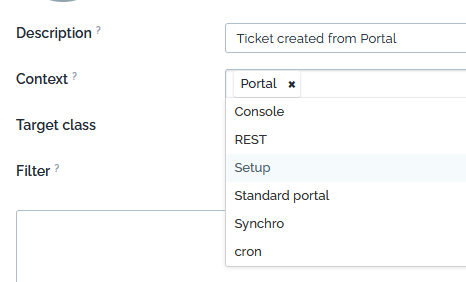
Trigger On object update with Contexts = Portal can replace the trigger when updated from the portal and be more specific, by specifying a particular portal and/or particular modified fields
Triggers brought by old versions of extensions will not propose Contexts.
-
For on threshold trigger, context is CRON, so make sure to put it, if you defined Contexts.
-
For Email Reply, the Contexts is limited to
Consoleby design of the extension. -
For others like “Notify on Expiration” the Contexts is CRON by design of the extension.
Triggered Actions
The “Triggered Actions” tab defines which action(s) will be executed when this trigger fires. Remember that one action can be linked to several triggers, so it's possible to reuse some actions. The “Order” field determines in which order, for a given trigger, the actions are executed (actions are launched in ascending order).
See the step by step example
Check below for trigger specific parameters and behaviors:
On object update
This trigger proposes to specify the Target fields. Specifying none, means that any field would fire the trigger. Otherwise, at least one of the specified fields need to be changed to activate the trigger.
The filter is applied before the object is written into the database, so write your OQL Filter to test the old values before object modification.
On entering/leaving a state
Both triggers require the State. The value to be entered for the “state” is the internal code of the state, as defined in the data model. State codes can be seen in the “Life Cycle” tab of the “Data Model”, section “Transitions”. The value code is the value listed between parentheses.
On threshold
This trigger requires a stop watch and a threshold. The expected value for the stop watch is an attribute code. User Requests and Incident tickets come with two stop watches: tto and ttr. The threshold is a percentage of the goal of the stop watch. With the standard data model you can use 75 or 100.
When log is updated
This trigger requires to specify the log code attribute on the Class. then only if a trigger and active action is configured, it adds on the Console only, a checkbox when editing that log, to manually allow the user to disable the notification if he wants.
On mention
This trigger requires to specify the Mentioned filter which is an OQL query specifying the Object (in general the Persons) which can be mention on a particular Target class object. This query can use placeholders to limit the returned Person based on the target class object attributes.
Behavior
Once you have set such Trigger on a class, when editing a log, if the user enters a special character (@ by default for Person, it's defined in the Configuration file) followed by a few characters then iTop searches for Person matching the entered characters. The returned Person can be limited by existing Trigger (on mention).
-
The Triggers must be applicable to the current object class, so having a Target class being a parent class or the class itself of the edited object.
-
The Mentioned filter on the Trigger must return Person (or Contact or any class in fact)
-
When there is more than one applicable
Trigger (on mention), then iTop does a UNION of the various Mentioned filter -
The Triggers applicable, even if they are not linked to an active Email notification, are taken into account to filter the Person
With this mechanism, if you are using iTop as a Service Provider, you can avoid mentioning a customer contact on a Ticket which would be for another unrelated customer.
Of course, the same behavior applies to other classes than Person, if the Configuration file mentions other allowed classes, with their own special character (see below).
This only applies to caselog, it is not working on other text or HTML fields.
Test your Trigger
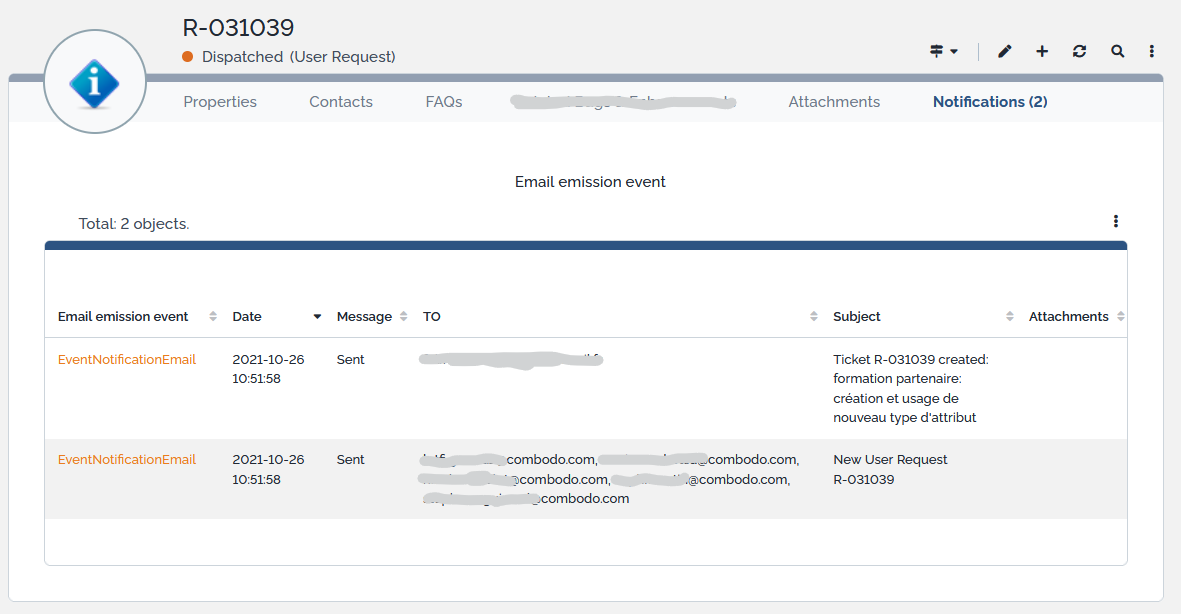
We strongly encourage you to test triggers and actions before moving them to production, by using the “Being Tested” status on actions.
You can see which notification had been sent for a given ticket (User Request, Incident, Change) using the tab “Notifications” in the details of the ticket.
You can also list all sent and failed notifications by using the page “Admin tools” / “Run Queries” and running the query:
SELECT EventNotification
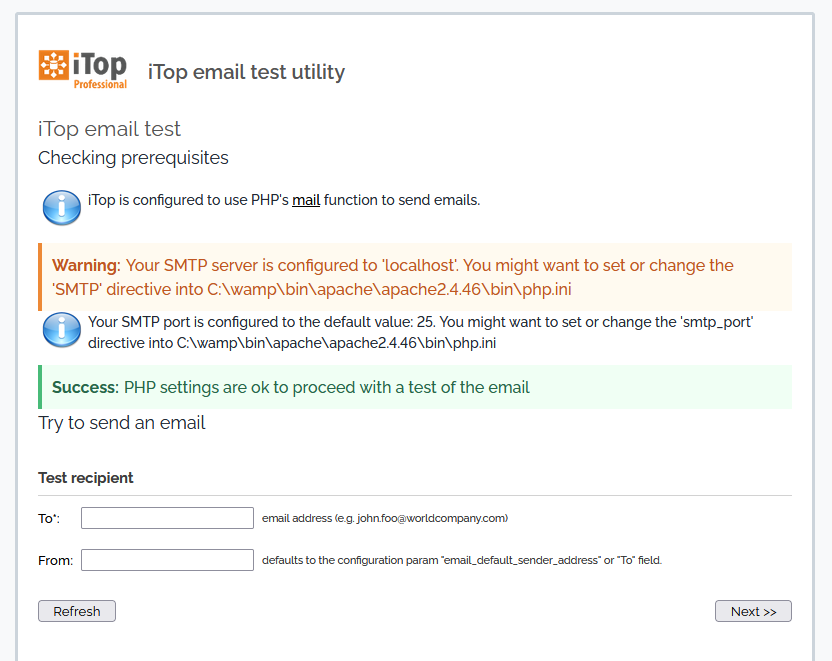
In order to test email notifications you can use, the “Test Page” (follow the link from the “Notifications” pages) or type:
http://<itop address>/setup/email.test.php
The test page performs a number of checks on the PHP configuration and allows you to send a plain-text email to the recipient of your choice. This is useful for validating that the PHP configuration of the server is indeed correct for sending emails.
You still have unanswered questions ? Ask us.
Give, get, ask…
Join our community of users to share your knowledge and good practices.